I had a really good idea for new year. I am going to start writing a new post for you called 'The Drugstore Edit' (Sorry if I copied, it was the first thing that came to my head) and this will feature a single product from the drugstore and I will tell you if it's worth the cut.
I plan to do one of these about once every 2 weeks, probably on a Wednesday or something. I'll give you a full run down on price, packaging, design, longevity, easiness to apply and so forth.
So look out for the first one tomorrow :)
- Roo xx

Tuesday, 31 December 2013
Saturday, 28 December 2013
Make Up of The Day!
I thought that I would start doing a 'Make Up of The Day' segment on my blog because they seem to be quite popular. So I'm going to do a run down of everything that I have used including skincare and prep before hand. So lets start.
 So this is my makeup to day and here is what I used;
Skin Care;
- Clinique 3 Step Anti Blemish Solutions
- Cinique Anti Blemish Solutions Spot Gel
- Bioderma Micelle Solution
- Clinique Repairwear Laser Focus Eye Cream
- Lancome Dreamtone in 1
- E.l.f Lip Exfoliator
Makeup;
- Revlon Photoready Primer
- Chanel Prolumiere in Rose Beige
- Collection Lasting Perfection Concealer in 1 Fair
- Revlon Nearly Naked Powder in 10 Fair
- E.l.f Contouring Bronze and Blush Set in St Lucia
- NARS Albatross Highlighter
- Urban Decay Primer Potion
- E.l.f Brow Kit in Light
- Naked 2 Bootycall and Tease
- E.l.f Cream Eyeliner
- Smashbox Full Exposure Mascara
- Collection lip pencil (Not sure what colour)
- M.A.C Lipstick in Russian Red
- Urban Decay Deslick Setting Spray
Friday, 27 December 2013
Essie Sleek Stick Nail Stickers Review/ First Impression/ Tutorial
I know that this is the 3rd post of the day and I have got loads to show you. I'm just going about my daily life and just finding things that I want to show you so I thought I'd share this one. I got 3 sets of these nail stickers by Essie as well as 6 of their polishes :) I've never tried nail stickers before nd I always feel a little skeptical about them because I have 1 really weird shaped nail and I just think that the shapes they give you are only going to work on those who have perfect shape nails. Anyway, here are my thoughts/tutorial.
 So I am using 09 Stickers and Stones.
It is a simple brown/grey colour with bubbled gem style details on the side of the nail.
 So I have trimmed my nails down so that they are all even an filed them straight. My hands are thoroughly clean and sanitized.
 So I applied one of the appliques and to be honest I really like it so far!
They have good sticking ability and fit on my nail quite well.
They give you 14 stickers in a set so that at least you have some options about size.
 So here it is before I've trimmed it down (sorry the picture's blurry).
You just need to make sure that it fits your nail alright and that it is properly stuck down before trimming the sticker.
 And here is the final result!
I did have a little bit of an issue with some of the edges not sticking down so well but I fixed this by just applying a bit of base coat underneath like a glue.
So I really like them so far, hopefully they will last as long as they say they will but I guess I will find out!
- Roo xx

It is a simple brown/grey colour with bubbled gem style details on the side of the nail.


They have good sticking ability and fit on my nail quite well.
They give you 14 stickers in a set so that at least you have some options about size.

You just need to make sure that it fits your nail alright and that it is properly stuck down before trimming the sticker.

I did have a little bit of an issue with some of the edges not sticking down so well but I fixed this by just applying a bit of base coat underneath like a glue.
So I really like them so far, hopefully they will last as long as they say they will but I guess I will find out!
- Roo xx
Urban Decay Naked 1, 2 and 3 Review!
If you saw my post about an hour ago then you will know that I got the Urban Decay Naked 2 and 3 for Christmas. I have had the original Naked Palette for quite some time and I want to do a full review for you given that I have had a chance to try them now.
*Just to let you know this is a long extensive post so if you're interested then grab a cuppa and a couple of biccies.
 So in a nice order, here are the 3 Naked Palettes.
All have pretty amazing packaging but to be completely honest I think the 2 and 3 are leagues ahead in terms of design with snap closes, solid plastic cases and much larger mirrors they are definitely more durable. But the packaging of the original Naked hasn't let me down yet so it isn't bad.
 Looking at the colours they don't seem too different but I assure you that this is purely my cameras fault, I can see the resemblance between 1 and 2 but honestly 3 is soo different and even then there are definite benefits to having 1 and 2.
1 has very wearable brown based neutrals, 2 has a few deeper/lighter more dramatic colours and 3 has very romantic soft pink based neutrals.
So lets do this in order. Here is my run down of Naked 1;
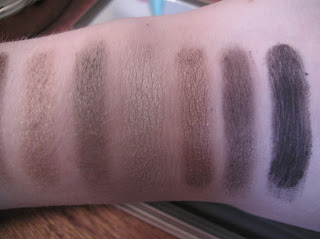
 I have separated the colours into 6 per picture just so you can see them better.
The first 6 are (From left to right):Virgin, Sin, Naked, Sidecar, Buck and Half Baked.
They are very light easily workable, blendable and highly pigmented neutrals perfect for everyday wear.
 I decided that it would be better if I showed you some swatches too and they are in the same order as before.
Virgin is the perfect pearly highlight but with light application it can be totally workable for everyday.
Sin also works as a highlight but it isn't as light as Virgin and is a bit more rosy in colour.
Naked is the perfect base colour, If you have anywhere from my skintone to light/medium this would really help to even out the tone of your eyes.
Sidecar is such an expensive looking colour, it has quite a lot of shimmer and I would probably say it's a deep champagne colour and is perfect to add a little more dimension to a look but is still very workable.
Buck goes perfect with naked and like I say about if you have a similar skintone to me then this is a great crease colour, its not too dark so it means that you can add definition to your eyes if you wanted to focus on something like winged eyeliner.
Finally Half Baked is a very highly pigmented gold shimmer and works for more special occasion eye makeup.
 This is the second half of the palette and the colours are (again from left to right): Smog, Darkhorse, Toased, Hustle, Creep and Gunmetal
This is the darker, more intense half.
 Smog, I think, is a darker version of Half Baked and has more of a bronze quality but again is super pigmented.
Darkhorse is a darker version of Smog but also the shimmer is a lot more muted but I love to pair these two together.
Toasted is a very pinky tone shimmer, it still has the brown colour in there but it is certainly different to the rest of the colours.
Hustle I think pairs perfectly with Toasted because it has purply undertones which both work together really well it still has quite a bit of shimmer though.
Creep is a sightly shimmery black but it isn't as intense as you might thin thought it is still quite dark.
Finally Gunmetal which is a very dark metallic grey and would really darken any look, Creep and Gunmetal and the only 2 in the palette which done have a warm brown undertone.
Overall rating: 9/10 - I love this palette and it is what I have used almost everyday since I got it. There is no fault whatsoever with the quality of the shadows and in fact they are the best that I have ever used but the only issue I have is actually a common thought about this palette and it is that it could do with more mattes, I would have liked to have seen at least one dark brown matte. But all in all this is totally worth the money.
Next up! Naked 2. Still with me? Good, I did warn you that this would very extensive and we've only been through one of them so far!
 So First 6, Foxy, Half Baked, Booty Call, Chopper, Tease and Snakebite.
There is only 1 repeat in all of these palettes and that is Half Baked which is a little annoying but I can live with it because I love the colour.
 My arms were a little cold here haha.
Foxy is a yellowy white matte. This is a perfect highlight if you don't want a shimmer or pearl finish.
Half Baked I don't really have to describe because I did it before.
Bootycall is another highlight colour but it has a little bit of a pearl finish and is similar to Virgin but the pearl is much more subdued.
Chopper is a coppery shimmer so has a reddish brown tone to it and is quite an intense shade.
Tease is another matte shade and is a very neutral medium toned brown, a sort of taupe shade.
Snake bite is actually quite dark considering where it has been placed in the palette it has a high simmer/pearl and is a very deep taupe shade.
 Next Half: Suspect, Pistol, Verve, YDK, Busted and Blackout.
 Suspect, to me, is a pearl version of Sidecar which had an intense shimmer.
Pistol is a grey brown and has the same finish as suspect.
Verve is again another stangely placed colour because this is a very bright and light silver shimmer colour which I would use as a highlight in the centre of the lid.
YDK and Busted are similar to Toasted and Hustle in the 1st Naked palette but the undertone aren't as intense in Naked 2.
Blackout, this is perfect! I don't use it often but it's so necessary. It's a deep matte back which I would end up using as a liner because I don't often use black but it is something that I think everyone should at least have in their makeup kit.
Overall Rating: 9/10 - It is a little similar to Naked 1 but has more mattes and some very essential colours but the fact that it has a colour repeat is a little disappointing because I think you could have used the space as an opportunity for another matte shade.
Finally, Naked 3.
 Overall this is a light palette but is totally pink, so if you're after a more feminine set of colours then this would be the one to go for.
The first 6 colours are: Strange, Dust, Burnout, Limit, Buzz and Trick.
 Strange is another matte highlight, it is a very pale pink and again like foxy is perfect if you don't want to have any shimmer/pearl.
Dust, oh my God! This colour if you don't like glitter then you will absolutely hate this. This has super chunky glitter pieces in and you have to be so careful when applying this because honestly it can get everywhere.
Burnout is a shimmery beige pink and I know that a lot of people said that they had an issue with this colour and that the intensity wasn't that high but I think if you apply it with a finger instead of brush then you will be able to get the right intensity.
Limit is like the matte version of Burnout and is the pink equivalent of Naked from Naked 1 (if that makes my sense).
Buzz is a simmer rose pink. In fact the shimmer is quite intense but no where near dust.
Trick is actually quite orangey and probably the odd one out in the selection but it still has pinky qualities so still ties in with all the other colours.
 Nest six: Nooner, Liar, Factory, Mug Shot, Darkside and Blackheart
I think this palette is similar to Nked 1 in the sense that the 'darker' shades are still not really that dark and are very wearable.

Nooner is the final matte shade in this palette and is a deep version of Limit and I really love when their matte shade are just deeper/lighter versions of one another.
Liar is a shimmery purple/brown.
Factory is like Liar but much deeper, I think its a common thing in these palettes to have 2 colours at least which pair up really well because they are along the same colour family.
Mugshot is another shimmer finish and its kind of a dirty pink champagne and again is one which has that really luxurious expensive look to it.
Darkside us a very slightly shimmery dark grey/brown/pink colour and would look perfect in the outer corner to add a bit more dimension.
Blackheart, now this was a shade I was super excited about. It's black but with lots of pink micro glitter in it and the glitter totally take off the edge from the black though its more of a really dark grey than a black.
Overall Rating: 10/10 - I know it seems a bit obviously that I would favour this one because it is totally new and different but to be honest I can't really fault it, the variety of finish is great and the fact that it has more mattes in is great and I love the pinks that it gives you.
Anyway that is finally the end of my review and I really hope that you have found this helpful and worth your time because I know that it was quite a lengthy post. I will be dong some form of video tutorial. To show you the variety if these palettes and be able to give you an idea of how you can use them to achieve loads of different looks.
Thanks for reading!
- Roo xx
*Just to let you know this is a long extensive post so if you're interested then grab a cuppa and a couple of biccies.

All have pretty amazing packaging but to be completely honest I think the 2 and 3 are leagues ahead in terms of design with snap closes, solid plastic cases and much larger mirrors they are definitely more durable. But the packaging of the original Naked hasn't let me down yet so it isn't bad.
 Looking at the colours they don't seem too different but I assure you that this is purely my cameras fault, I can see the resemblance between 1 and 2 but honestly 3 is soo different and even then there are definite benefits to having 1 and 2.
1 has very wearable brown based neutrals, 2 has a few deeper/lighter more dramatic colours and 3 has very romantic soft pink based neutrals.

The first 6 are (From left to right):Virgin, Sin, Naked, Sidecar, Buck and Half Baked.
They are very light easily workable, blendable and highly pigmented neutrals perfect for everyday wear.
 I decided that it would be better if I showed you some swatches too and they are in the same order as before.
Virgin is the perfect pearly highlight but with light application it can be totally workable for everyday.
Sin also works as a highlight but it isn't as light as Virgin and is a bit more rosy in colour.
Naked is the perfect base colour, If you have anywhere from my skintone to light/medium this would really help to even out the tone of your eyes.
Sidecar is such an expensive looking colour, it has quite a lot of shimmer and I would probably say it's a deep champagne colour and is perfect to add a little more dimension to a look but is still very workable.
Buck goes perfect with naked and like I say about if you have a similar skintone to me then this is a great crease colour, its not too dark so it means that you can add definition to your eyes if you wanted to focus on something like winged eyeliner.
Finally Half Baked is a very highly pigmented gold shimmer and works for more special occasion eye makeup.

This is the darker, more intense half.

Darkhorse is a darker version of Smog but also the shimmer is a lot more muted but I love to pair these two together.
Toasted is a very pinky tone shimmer, it still has the brown colour in there but it is certainly different to the rest of the colours.
Hustle I think pairs perfectly with Toasted because it has purply undertones which both work together really well it still has quite a bit of shimmer though.
Creep is a sightly shimmery black but it isn't as intense as you might thin thought it is still quite dark.
Finally Gunmetal which is a very dark metallic grey and would really darken any look, Creep and Gunmetal and the only 2 in the palette which done have a warm brown undertone.
Overall rating: 9/10 - I love this palette and it is what I have used almost everyday since I got it. There is no fault whatsoever with the quality of the shadows and in fact they are the best that I have ever used but the only issue I have is actually a common thought about this palette and it is that it could do with more mattes, I would have liked to have seen at least one dark brown matte. But all in all this is totally worth the money.
Next up! Naked 2. Still with me? Good, I did warn you that this would very extensive and we've only been through one of them so far!

There is only 1 repeat in all of these palettes and that is Half Baked which is a little annoying but I can live with it because I love the colour.

Foxy is a yellowy white matte. This is a perfect highlight if you don't want a shimmer or pearl finish.
Half Baked I don't really have to describe because I did it before.
Bootycall is another highlight colour but it has a little bit of a pearl finish and is similar to Virgin but the pearl is much more subdued.
Chopper is a coppery shimmer so has a reddish brown tone to it and is quite an intense shade.
Tease is another matte shade and is a very neutral medium toned brown, a sort of taupe shade.
Snake bite is actually quite dark considering where it has been placed in the palette it has a high simmer/pearl and is a very deep taupe shade.
 Next Half: Suspect, Pistol, Verve, YDK, Busted and Blackout.
Pistol is a grey brown and has the same finish as suspect.
Verve is again another stangely placed colour because this is a very bright and light silver shimmer colour which I would use as a highlight in the centre of the lid.
YDK and Busted are similar to Toasted and Hustle in the 1st Naked palette but the undertone aren't as intense in Naked 2.
Blackout, this is perfect! I don't use it often but it's so necessary. It's a deep matte back which I would end up using as a liner because I don't often use black but it is something that I think everyone should at least have in their makeup kit.
Overall Rating: 9/10 - It is a little similar to Naked 1 but has more mattes and some very essential colours but the fact that it has a colour repeat is a little disappointing because I think you could have used the space as an opportunity for another matte shade.
Finally, Naked 3.

The first 6 colours are: Strange, Dust, Burnout, Limit, Buzz and Trick.
 Strange is another matte highlight, it is a very pale pink and again like foxy is perfect if you don't want to have any shimmer/pearl.
Dust, oh my God! This colour if you don't like glitter then you will absolutely hate this. This has super chunky glitter pieces in and you have to be so careful when applying this because honestly it can get everywhere.
Burnout is a shimmery beige pink and I know that a lot of people said that they had an issue with this colour and that the intensity wasn't that high but I think if you apply it with a finger instead of brush then you will be able to get the right intensity.
Limit is like the matte version of Burnout and is the pink equivalent of Naked from Naked 1 (if that makes my sense).
Buzz is a simmer rose pink. In fact the shimmer is quite intense but no where near dust.
Trick is actually quite orangey and probably the odd one out in the selection but it still has pinky qualities so still ties in with all the other colours.
 Nest six: Nooner, Liar, Factory, Mug Shot, Darkside and Blackheart
I think this palette is similar to Nked 1 in the sense that the 'darker' shades are still not really that dark and are very wearable.

Nooner is the final matte shade in this palette and is a deep version of Limit and I really love when their matte shade are just deeper/lighter versions of one another.
Liar is a shimmery purple/brown.
Factory is like Liar but much deeper, I think its a common thing in these palettes to have 2 colours at least which pair up really well because they are along the same colour family.
Mugshot is another shimmer finish and its kind of a dirty pink champagne and again is one which has that really luxurious expensive look to it.
Darkside us a very slightly shimmery dark grey/brown/pink colour and would look perfect in the outer corner to add a bit more dimension.
Blackheart, now this was a shade I was super excited about. It's black but with lots of pink micro glitter in it and the glitter totally take off the edge from the black though its more of a really dark grey than a black.
Overall Rating: 10/10 - I know it seems a bit obviously that I would favour this one because it is totally new and different but to be honest I can't really fault it, the variety of finish is great and the fact that it has more mattes in is great and I love the pinks that it gives you.
Anyway that is finally the end of my review and I really hope that you have found this helpful and worth your time because I know that it was quite a lengthy post. I will be dong some form of video tutorial. To show you the variety if these palettes and be able to give you an idea of how you can use them to achieve loads of different looks.
Thanks for reading!
- Roo xx
Happy Holidays
I hope you all have had a very merry Christmas or if you don't celebrate it at least then I hope you have enjoyed the holidays.
I know that I have been completely spoiled and I'm sure that you will see what I managed to get in upcoming posts/videos but I have to tell you that I did get the Urban Decay Naked 3 palette and I will try and do a tutorial for you, perhaps a day to night style thing.
But as for my availability to post in the upcoming year, I will have more time for probably the first moth and will try to get a fair amount done but I don't really know what is happening after that but I will be sure to let you know.
Anyway, I'm going to get onto planning, filming and editing things for you all so I should have something up in the next week or so.
- Roo xx
Monday, 23 December 2013
A Preemptive and Very Sincere Apology
I know that my plans had been to do 12 lots of nail tutorials for you before Christmas but I have now discovered that I can't do it. I got as far as I could but I have just been caught up with so many other things. I know that you won't really want to hear excuses but I have really been wrapped up with Christmas (pun totally intended) and I feel like I have let you down, if you were interested anyway.
I will try and post more things and I can't guarantee what sort of stuff I will post but it will just be whatever I can think of. Perhaps you have suggestions for me.
Anyway I think this will be my last post before Christmas so I wish you all a very Happy Christmas and I hope you all have a great time :)
Speak soon
- Roo xx
Saturday, 21 December 2013
Day 5 Christmas Nails!! Deck the Halls
So I have been really trying to get these uploaded for you and I hope that you appreciate the effort considering that it is 4 days before Christmas and I have yet to finish my wrapping! Jokes :P All aside I love anyone who reads my blog and just that makes me happy enough - I will however feel quite disappointed if I can't get these finished in time :/
But anyway, Here is day 5!
PS, when I have just uploaded the photos I realised I did such a crap job of documenting this. So it just jumps really far :S
So I hear you ask, 'what will I need for this?' Well it's your lucky day because I'm going to tell you!
- Glittery Green Polish
- Black Nail Polish
- White Nail Polish
- Red Nail Polish
- Yellow Nail Polish
 Clean nail and I'm just going to mention this part because my mind failed to remind me to take pictures.
Take a base coat and apply that before anything else (Obv!)
Then take the glitter green polish and apply a few coats of that to build up opacity and when that's completely dry you can move onto the nail art.
 As you can see I did kind of skip ahead a little, but this is where you should get to after this next step.
Take the black polish and draw the wire for fairy lights.
You can make this as random as you like which is what I like about this design. Really use your imagination and be as creative as possible.
 Take the red, yellow and white to draw the bulbs.
You can choose what ever colours you like but I thought that these would look the best. So add as many bulbs as you like.
Add a top coat and then the look is finished.
I really hope you like this and feel free to share your designs with me too.
-Roo xx
But anyway, Here is day 5!
 |
| Fairy lights! |
PS, when I have just uploaded the photos I realised I did such a crap job of documenting this. So it just jumps really far :S
 |
- Glittery Green Polish
- Black Nail Polish
- White Nail Polish
- Red Nail Polish
- Yellow Nail Polish

Take a base coat and apply that before anything else (Obv!)
Then take the glitter green polish and apply a few coats of that to build up opacity and when that's completely dry you can move onto the nail art.

Take the black polish and draw the wire for fairy lights.
You can make this as random as you like which is what I like about this design. Really use your imagination and be as creative as possible.
You can choose what ever colours you like but I thought that these would look the best. So add as many bulbs as you like.
Add a top coat and then the look is finished.
I really hope you like this and feel free to share your designs with me too.
-Roo xx
Friday, 20 December 2013
Christmas Nails Day 4! Gingerbread Manicure
This is a super simple design as you really are only painting your ring fingers, I think it looks so sweet and really elegant for the holidays.
 So what you will need;
- Light brown polish
- White polish
- Black polish
- Red polish
- Cocktail sticks
 Pictures sideways but oh well!
Clean nails! Make sure they are all uniform and well treated.
 After applying a base coat take the brown polish and draw out a little ginger bread man shape on your nail. Then let it dry befre we add any detail.
 Take your white polish and with either a cocktail stick or a nail art attachments draw on little buttons and trim on the arms and legs.
 Take a cocktail stick and with the red polish add colour to the little buttons and add a smile, a bit like strawberry laces!
 Take the black and add some eyes. Your nails are now done!
Super simple and really easy to do. Try it out and let me know how it goes for you all!
- Roo xx
BONUS PICTURE!!
So I really had to include this because I thought it was amazing but as I was taking the polish off, this happened!

He stayed in tact and I just thought it was soo beautfiul that I really had to share this with you :D
 So what you will need;
- Light brown polish
- White polish
- Black polish
- Red polish
- Cocktail sticks

Clean nails! Make sure they are all uniform and well treated.


Super simple and really easy to do. Try it out and let me know how it goes for you all!
- Roo xx
BONUS PICTURE!!
So I really had to include this because I thought it was amazing but as I was taking the polish off, this happened!

Day 3 Christmas Nails - Candy Cane
I mentioned in a previous post about the consistency of the posting of these nail tutorials and to be honest I've been quite bad with it. I have long days at work and when I get at home I feel stupidly tired (I legit nearly fell asleep in my dinner tonight) but this shouldn't be an excuse, especially if I promise to do something, so I'm sorry for delaying this and keeping you all out of the loop a little. But anyway, I'm going to do bulk uploads of these tutorials to get them done before Christmas which is when I said that I would get them up by - actually I said a week before Christmas but that is no longer an option (sorry!)
Here we go!
 So you will need;
- Base/Top coat (Sorry not pictured)
- Red polish
- White polish
- Glitter coat (optional)
- Striping brush
 As per the norm, strip your nails and make sure they are perfectly clean.
 After you've applied a base and let it set, put on a coat or 2 of your white polish.
Make sure that it id completely covered and there aren't any sheer patches.
Let it fully dry, like not just touch dry but really dry.
 Take a striping brush or the nail polish brush (if your certain you can get a neat line) a paint red lines across in whatever direction you want. I chose to do mine diagonal because I prefer it.
 Continue to do this to the rest of your nails until it looks like this.
 I added quite a few coats of glitter because I think it adds something and who doesn't love glitter!
This is the final design I hope that you like this tutorial and I will try my best to get the rest uploaded asap.
Roo x
Here we go!

- Base/Top coat (Sorry not pictured)
- Red polish
- White polish
- Glitter coat (optional)
- Striping brush

Make sure that it id completely covered and there aren't any sheer patches.
Let it fully dry, like not just touch dry but really dry.


This is the final design I hope that you like this tutorial and I will try my best to get the rest uploaded asap.
Roo x
Thursday, 12 December 2013
Shopping in Brussels!
I am back in the UK after a lovely little ferry ride over to Belgium - more specifically I went to Brussels!
I went for the Christmas market but actually didn't really pay to much attention to it because I wanted to visit all the other shops and just generally explore. I only bought a few beauty items but thought that it would be nice for you too see what I bought :)
 I am so excited about this because I know that this is a product that most people seem to like, this is Bioderma Micelle Solution. I got it for roughly 16 euros which is about £12. I am really happy I have this and it was one of the things that I was desperate to pick up because I thought I stood a very good chance of finding this.
I will probably update you on this when I have a good idea as to whether I like it or not.
 This is something that I could get in the UK but this is a very small bottle which I could not find anywhere here. It's the Caudalie Beauty Elixer and I waited because I didn't want to spend a lot of money on a full size product and then find that I don't like it because that would be super disappointing!
This was about 11 euros which I think is about £8 but I don't know how the prices compare to over in the UK, I may well have been ripped off for all I know :P
Again I'll more than likely update you in the same post as the Bioderma one
 Finally this is a product I know I like and if you have followed my YouTube channel then you will have seen an empty purple tube in one of my favourites video!
I decided to go for this because it was 20 euros for the set which works out at about £15-16 and each was 7.50 euros. I think they're about £8 each anyway over here so you really do make a saving!
I wanted to try the other scents because I liked the one that I had anyway.
Anyway, this was what I bought when I went to Brussels.
I did want to explain about my November favourites post. I know that I haven't done one and we are about midway through December now. I am going to try and get more nail tutorials up for you and I will probably upload these in bulk and if I feel like I can then I am just going to do a late favourites video but if I can't then I do apologise but I will try and do a bumper December favourites to make up for it.
- Roo xx
I went for the Christmas market but actually didn't really pay to much attention to it because I wanted to visit all the other shops and just generally explore. I only bought a few beauty items but thought that it would be nice for you too see what I bought :)

I will probably update you on this when I have a good idea as to whether I like it or not.

This was about 11 euros which I think is about £8 but I don't know how the prices compare to over in the UK, I may well have been ripped off for all I know :P
Again I'll more than likely update you in the same post as the Bioderma one

I decided to go for this because it was 20 euros for the set which works out at about £15-16 and each was 7.50 euros. I think they're about £8 each anyway over here so you really do make a saving!
I wanted to try the other scents because I liked the one that I had anyway.
Anyway, this was what I bought when I went to Brussels.
I did want to explain about my November favourites post. I know that I haven't done one and we are about midway through December now. I am going to try and get more nail tutorials up for you and I will probably upload these in bulk and if I feel like I can then I am just going to do a late favourites video but if I can't then I do apologise but I will try and do a bumper December favourites to make up for it.
- Roo xx
Tuesday, 10 December 2013
Day 2 Christmas Nails - Snowy Rudolph
I know that I am posting day 2 before day 1 which it very confusing. Day 1 is actually in video form and is undergoing final editing, I tried to upload it but it failed so I have to start again :(
Anyway, I am going to alternate between YouTube and blog just to try and keep new posts coming in on both. I really love this one, I just think it looks so pretty and it's perfect if you work somewhere where you can't have bright coloured nails or anything too flashy :)
On to the tutorial!

What you will need:
- Nail file (as always, neaten up those edges!)
- Top/Base Coat, mines Sally Hansen Double Duty
- White nail polish, mine comes in a handy little nail art pen :)
- Light brown nail polish, I can't remember the name of mine but I know it's by Bourjois.
- Red nail polish, I chose a metallic because it adds a bit more dimension to the design.
- Black nail polish, mine a Nails Inc./Kate Spade one because it came with a magazine haha.
- Rainbow glitter top coat.
- Cocktail sticks (For fine detail)
 So clean, file nails as always, I'm just going tot apply a nice even layer of the base coat. Leave it to dry for about 5-10 mins before moving onto the next step.
 One that has dried you can add little random white dots on your nails. It looks good either uniform or random because we are going for a snow look. If you don't have a nail art pen like the one I have then the cocktail stick come in super useful. Failing that you could use the end of a paperclip, a flat bottomed pin or anything with a fine point, be creative!
 I got excited and skipped ahead a little before taking any more photos haha, sorry!
with the brown nail polish just make the shape of a reindeer hear and antlers, again cocktail stick of details :)
Dab on the red nail polish at the bottom of the nail so it looks like he's peering over :P
 Take the black polish and you should know by now what we need to do the eye, that's right - Cocktail sticks!
make them big enough to stand out but not too big that they take over the design.
 And some glitter! Everything looks better with a little glitter!
And you're done! It's so simple but I think it still looks really festive.
Anyway, stay tune because I will be posting more but not for a few days, I'll have to upload quite a few in a day for you but I am away in Brussels as of tomorrow :D Ahh excited!
Anyway, I'll keep you posted.
- Roo xx
Anyway, I am going to alternate between YouTube and blog just to try and keep new posts coming in on both. I really love this one, I just think it looks so pretty and it's perfect if you work somewhere where you can't have bright coloured nails or anything too flashy :)
On to the tutorial!

What you will need:
- Nail file (as always, neaten up those edges!)
- Top/Base Coat, mines Sally Hansen Double Duty
- White nail polish, mine comes in a handy little nail art pen :)
- Light brown nail polish, I can't remember the name of mine but I know it's by Bourjois.
- Red nail polish, I chose a metallic because it adds a bit more dimension to the design.
- Black nail polish, mine a Nails Inc./Kate Spade one because it came with a magazine haha.
- Rainbow glitter top coat.
- Cocktail sticks (For fine detail)
 So clean, file nails as always, I'm just going tot apply a nice even layer of the base coat. Leave it to dry for about 5-10 mins before moving onto the next step.

with the brown nail polish just make the shape of a reindeer hear and antlers, again cocktail stick of details :)
Dab on the red nail polish at the bottom of the nail so it looks like he's peering over :P

make them big enough to stand out but not too big that they take over the design.
 And some glitter! Everything looks better with a little glitter!
And you're done! It's so simple but I think it still looks really festive.
Anyway, stay tune because I will be posting more but not for a few days, I'll have to upload quite a few in a day for you but I am away in Brussels as of tomorrow :D Ahh excited!
Anyway, I'll keep you posted.
- Roo xx
Friday, 6 December 2013
Upcoming Project! - Twelve Days of Christmas Nails!
So if you have read an earlier post of mine then you will know that I am doing a set of nail tutorials based on the 12 days of Christmas. I have had a look into this and (after much care and thought going into this!) It would be very difficult not to mention strange to have leaping lords and milking maids on your nails. Not only that but you also can't fit 12 individual things on 10 nails unless you are willing to compromise on space and quality of design.
Any who, I don't want to disappoint you all so I am still doing this but it will be based on very recognisably Christmassy things instead of based on the song. I thought that this would also be a lot easier for everyone if they were wanting to try them out for reals!
More to the point, today is the first day of filming and if I don't get this up by today then it will certainly be by tomorrow or Sunday at the very latest. I am trying to work in a way that I will get all of these designs done for you and still give you plenty of time before Christmas to gather your supplies.
Be sure to keep an eye out for these and I will speak soon!
- Roo xx
Sunday, 1 December 2013
The Not Quite Ready For Christmas Nails!
I thought that it would be a good idea to show you a nail idea which is perfect for those of us who can't accept that it's close to Christmas and are generally not prepared, but also want to try!
 This is going to be your equipment for this look, not much but that's perfect for this look :)
- Boots 17 Magnetic Nail Polish - I have a deep green colour but I don't know the name haha. Also these magnetic polishes are half price in Boots at the moment but I think you need to claim your voucher with your Advantage card.
- Boots 17 Glitter Top Coat
- Sally Hansen Double Duty top and base coat
- Nail File
 My nails are looking a little messy but anyway. It's always good to start off with clean hands and neat nails, so file down any rough edges and make your nails about the same length.
 Apply a base coat with the Sally Hansen Double Duty or any base coat you prefer, this helps to prolong the wear of your polish and to also protect your natural nail from the colour of the polish your going to use.
 This is actually my first time of using a magnetic polish and though they have been around for a long time I have never seen the need to buy it. This actually applies really thick and and you will only need one coat. Whilst the polish is still wet, use the magnet on top of the lid and hold close above your nail for a few seconds. Try not to touch your nail with it, pull the magnet away and you'll see the pattern emerge.
 This is the finished result once the magnetic polish has dried, it has an amazing holographic effect and is just so effortless to do.
 After your nails are dry apply 2 coats of the glitter top coat, depending obviously on how glittery the polish you have chosen is.
 And Here we are! The finished result! I love this design because it is perfect for the purpose, the colour is Wintery and the glitter add a little something but it doesn't outright look like Christmas nails.
I really hope you like this look and let me know if you give it a go.
Also, I have a special project coming up for which I have to be super dedicated! I am going to do themed nails based on the 12 days of Christmas and I have a few ideas for some but this is going to be a challenge, I will try and get all of the videos up for about a week before christmas to give you all a chance to get your supplies and give them a go :)
So keep your eyes peeled :)
- Roo xx

- Boots 17 Magnetic Nail Polish - I have a deep green colour but I don't know the name haha. Also these magnetic polishes are half price in Boots at the moment but I think you need to claim your voucher with your Advantage card.
- Boots 17 Glitter Top Coat
- Sally Hansen Double Duty top and base coat
- Nail File


I really hope you like this look and let me know if you give it a go.
Also, I have a special project coming up for which I have to be super dedicated! I am going to do themed nails based on the 12 days of Christmas and I have a few ideas for some but this is going to be a challenge, I will try and get all of the videos up for about a week before christmas to give you all a chance to get your supplies and give them a go :)
So keep your eyes peeled :)
- Roo xx
Subscribe to:
Posts (Atom)