Saturday 31 May 2014

Maleficent Inspired Make Up

I'm sure that you will have seen some form of advertisement for the new live action Maleficent film starring Angelina Jolie because it has literally been everywhere. There have been a few tutorials floating around and especially since MAC launched a Maleficent line to go alongside the launch of the movie. Since there have been a few tutorials going around I wanted to try my hand at creating a wearable (possibly not) version of the look. 


I say probably not that wearable mainly because it does look a little harsh with the contour but obviously you can take that away and it doesn't have the weird cheek prosthetics. 

So what's on my face?

Base:
- Benefit Porefessional Primer
- Elf Eyelid Primer
- Chanel Perfection Lumiere in 12 Beige Rose
- Elf Bronxer in St Lucia
- Maybelline Matte Maker Pressed Powder in Ivory
- Collection Lasting Perfection Concealer

Eyes:
-Urban Decay Naked 1 (Naked, Half Baked)
-Urban Decay Naked 2 (Foxy, Tease, Blackout)
- MAC Extended Play Gigablack Lash Mascara

Brows:
-Elf Brow Duo Wax in Light
- Urband Decay Naked 2 (Tease, Blackout)

Lips:
- Collection Lip Liner in Paprika 
- MAC Matte Lipstick in Russian Red 
- Rimmel Apocalips Lip Lacquer in Big Bang

I felt like there was a tonne of product on my face because I was going for quite an angular look that took a lot of product. I reckon you could lose the contour and the look would be really wearable. 

Let me know what you think of this. 

Speak soon
Roo xx

Thursday 29 May 2014

Lancome La Base Pro Primer Review

I feel totally obsessed with primers and more specifically finding the ultimate holy grail product. It's a difficult task and I think that the more you try the more you realise that primers are really a personal thing it the sense that what works for you might not work for someone else. We all have different preferences when it comes to primers but enough rambling, here's another review! 


I am in love with Lancome's packaging! (Have I mentioned that before?). This product is no exception to the love, the bottle is made out of glass and has a really nice thick heavy expensive feel about it. The bottle also has a frosted finish which I think shows the effect that the product is going to potentially have (mattifying?), maybe I'm just getting carried away here. This is also has a pump which I love because it makes it a lot easier to control the amount of product you get and it's also really hygienic. 


 This comes out perfectly clear and I have to say a little bit goes a long way! I wouldn't say this has a mattifying finish but does help minimise pores and leaves you skin feeling incredibly smooth. 

I have used this both on myself and my mum when I did her make up which you can see here. I found the application great of both skin types but I think that it was better on more mature skin than mine. I felt that though I like the primer it wasn't what I was looking for in finish. My mum however loved it and on inspection (haha sounds serious) the foundation had stayed put for a good 6+ hours without melting or shifting in any way. 

This does come in at a hefty £28.50 and you get 25ml of product. I know that doesn't seem like a lot to justify the price but I reckon you use a lot less of this than you would of most other primers. But as always, be sure to do your research. 


Have you tried this? What do you think?

Speak soon
Roo xx

Tuesday 27 May 2014

Lancome Hypnose Doll Eyes Mascara Review

I wouldn't exactly call this a first impressions as I have used it once before and before that I knew I was going to love it.

The box alone is so beautiful, it's a silver box with black writing and the famous Lancome rose embossed onto the box. Really simple but very elegant. The mascara tube is also quite simple but it just feels so nice and expensive (which it is).


This is pre-mascara, I have really short lashes so finding a mascara that lengthens can be a challenge.


After 1 coat, I think this looks super natural and really pretty. To be honest I could have stopped there for a nice subtle make up look but as I usually wear liner I want to make my lashes stand out as much as possible.


This is after 2 coats, as I say I don't have long lashes but it helps to give them a bit of length and volume. I especially love the formula of the Lancome Hypnose range because it is easy to build up and reapply as the formula almost feels like it becomes a liquid again when you go in for a second coat which makes it so much easier. They are also long wearing and not a pain to get off. 

Have you tried any Lancome Mascaras? What do you think?

Speak soon 
Roo xx

Monday 26 May 2014

First Impressions: Invisibobble

I have seen these posted around but didn't really pay too much notice. However, I was in Boots today and for some reason was drawn to them and had to have them. So here we are now with another First Impression review. 


Super intrigued by these and I decided to go for the clear version because it is called 'Invisibobble' so I thought I would give it fair chance to demonstrate that.  


So this is what the bobble looks like. Very strange, reminds me of old fashioned telephone wires.


Surprisingly it was actually super easy to stretch out and was bigger than I thought it would be. I was expecting that it would be super difficult to put my hair in a bun but actually it was nice and easy.


My hair is a little wet (add an extra challenge) but I would not say that this is completely invisible but it's also not massively obvious that your bobble in on show. I reckon that actually I need a bit of practice and then I will be able to get it looking invisible. 

Have you tried these? What do you think?

Speak soon
Roo xx

Diet Update

As I said, I am going to try and post these regularly - I feel like it's motivation. 
So I was having massive problems trying to get the weight to come off but it seems like it's starting to happen now. I recently started a cleaning job and honestly it's like doing a non-stop cardio workout which coupled with eating less/better food seems to be helping me out a great deal.

**DISCLAIMER**
I don't want this to look like I hate the way I look because I don't - there are plenty of things I like about myself. Like most people I have a few insecurities and also I have felt sluggish of late so this is more to do with actual health and not vanity. My diet is not that serious but if you were planning to undertake an intense diet plan I highly recommend speaking with your GP first.

Here are my current measurements:

Height - 5ft 7.5 in/ 1.71m  (not going to change)
Weight - 10st 6lbs/ 146lbs
BMI - 22.6 (down by 0.2)

I thought that I should also include my body measurements to track because I like seeing physical progress.

Hips - 40in
Waist - 27"
Bust - 36"
Muffin Top - 37" (Thought I should include this because it's what bothers me the most, also I don't know the technical term.)
R Thigh - 24.5"
L Thigh - 24.5"


Target:

Weight  - 9st 4lbs/ 130lbs
BMI - 20.1 (Still well into healthy range)

Weight to lose - 16lbs
Time Period - 13 weeks 
Weekly goal - By 01/06/14 - 10st 5lbs

I didn't meet my last goal but weight has come off, I have just started an intense job and I feel that I need to really watch what I eat.

Hopefully my update will be loads better on Sunday.

Speak soon
Roo xx


Doing My Mother's Makeup

I love doing make up on other people, I find it fun and relaxing and I tend to get into a super trance-zone state (weird!). Anyway I had wanted to do my mum's make up for a long time and I got to chance yesterday so I went ahead and took it. 


So I went for quite a neutral look because I know she likes a subtle make up look. Here are the products I used:

Base
Lancome La Base Primer 
Elf Eye Primer
Chanel Perfection Lumiere in 12 Beige Rose (Applied with Real Techniques Expert Face Brush)
Collection Lasting Perfection Concealer 
Maybelline Matte Maker Powder
Hourglas Ambient Lighting Blush in Diffused Heat
Elf St Lucia Bronzer
NARS Highlighter in Albatross 

Brows
Elf Brow kit in Light (Wax only)
Urban Decay Buck Eyeshadow

Eyes
Urban Decay Naked Palette (Virgin, Sin and Darkhorse)
Urban Decay Naked 2 Palette (Foxy, Tease, Busted and Blackout) 
Lancome Hypnose Doll Eyes Mascara 

Lips
MAC Creme Cup Cremesheen Lipstick
No7 High Shine Lip Crayon in Delicate Pink


So I really enjoyed doing this make up look and I really hope you like it. Let me know what you think and also let me know if you would like to see more posts like this. 

Speak soon 
Roo xx

Friday 23 May 2014

Fixation Friday: Hourglass Ambient Lighting Palette

I feel like I've already talked about this before but lets talk about it again because it is so damn beautiful!

Oh yes, lets just stare at the pretty palette for a while. Sometimes I just want to sit and weep in the corner for the fact that I am going to have to wait until the end of August to be able to get my hands on it and knowing my luck it will be out of stock when I can buy it. 

Ok so this is the Hourglass Ambient Lighting Palette which I'm sure you've probably seen before. Before we get into the product just take a moment to appreciate the packaging, it's so sleek and has a very expensive feel about it. I have one Hourglass item so I am familiar with the style of packaging and it feels very sturdy and well put together and though it isn't massively important to the stuff inside it's nice to hold and stare at. 

This palette features 3 powders called (from left to right) Dim Light, Incandescent Light and Radiant Light. The possibilities with this palette make me giddy with excitement, but then I get giddy over make up in general. 

This is a pricey £56 but considering you're getting 3 high end powders (albeit not full size) it works out at just under £19 per powder, still sounds crazy but I have wanted this for a long time and I generally don't make big purchases without thoroughly considering whether I truly want/need this product. 

Have you tried this? What do you think?

Speak soon
Roo xx 

Thursday 22 May 2014

What's In My Make Up Bag? (Pic Heavy + Swatches!)

I love seeing these types of posts/ videos mainly because I'm nosey and love seeing other people's make up.  Lately I feel like my own make up has become a little jam packed and that it's a great opportunity to show you what's actually in it!


I forewarn you, this is going to be a long and pic-heavy post. I suggest you grab a cuppa and a snack haha :)


So this is my make up bag and I'm certain that this was probably Mary Poppins' make up bag because the amount of space is ridiculous - even with my unnecessary amount of make up there is still space for more things.

I did actually get this from Clinique as it came with one of their gift promotions where you buy 2 items and get a whole load of goodies. I really love this because of the space, I've had other make up bags in the past and their either not wide enough or they aren't deep enough. So lets talk about the make up in it.

The Base


Chanel Perfection Lumiere in 12 Beige Rose
I am in love with this foundation! I've had it for a little while now and I love it more and more each time I use it. This is a VERY pink based foundation but I think that's down to the shade and they do quite a lot of shades where I am sure that some are yellow based. On another note, this stuff is fragranced and I am obsessed with the scent, if anyone knows if the fragrance of this is the same as a perfume they sell then I would be super happy if you could let me know. If not the Chanel take note and make that into one of your perfumes, It's amazing!!

Collection Lasting Perfection Concealer in 1 Light
This stuff has gained a bit of a reputation in the beauty blogging world and it's no surprise why. If you have had the good fortune of trying this then you will know exactly what I am talking about. Firstly the texture is thick and creamy which I find nice to apply and secondly this has mega coverage. This is totally inexpensive so is reallly good value.

Benefit Porefessional Primer
I have only tried this out a few times so it's still very much in the testing phase. I do quite like it so far as it feels quite nice to apply, it makes my make up last and as far as I'm aware it hasn't clogged my pores.

Elf Lid Primer
I have been using this for a while now as I ran out of my Urban Decay Primer Potion, which is my favourite. I honestly think this stuff is great value for money because it actually does a pretty good job. I never go without an eye primer because it does make a huge difference to the colour pay off and wear time of your shadows and liners, if you are wanting to try an eye primer but are working on a budget or don't quite want to pay out because you might be a little sceptical then give this a go, I promise you won't regret it.  

Maybelline Matte Maker Mattifying Powder
Another new product to me and I've had it about 3 weeks and it seems pretty legit so far. It's definitely mattifying and I haven't had any issues with cakey-ness when reapplying as the day goes on. Again not a very expensive product and definitely one worth a try.

Real Techniques Powder Brush and Expert Face Brush
By far the best brushes I have used. The powder brush is large enough that it picks up enough powder to be able to cover your face but not so much that it becomes cakey. The Expert Face Brush is the absolute perfect brush for the Chanel Perfection Lumiere foundation - it makes it absolutely flawless!

(from left to right - Chanel Perfection Lumiere, Collection Lasting Perfection Concealer, Benefit Porefessional Primer, Elf Lip Primer and Maybelline Matte Maker Powder)


The Cheeks


Hourglass Ambient Lighting Blush in Diffused Heat
I jumped on this as soon as I saw it, I hunted it down and parted with my cash so easily and I don't regret a thing! Though there were a few different ones I would have chosen I am happy I went with this colour because I think it suits my skin tone perfectly. It is a little pricey but if you know what suits you then I say give it go :)

Elf Contouring Blush & Bronze in St Lucia
I got this as one part of my first order from the Elf website. I was more interested in the blush than the bronzer but I got the duo because I thought 'Can't hurt to have a bronzer in my collection!'. I actually use the bronzer a fair bit and only ever in a light handed fashion otherwise it would be far too much. I do use the blush but more like a blush primer because the colour isn't overly strong I usually sweep it across my cheeks and then focus a stronger blush on the apples (not too much though!).

NARS Highlighter in Albatross
This was the first ever highlighter I have ever bought, I was completely new to it all and it has literally stepped up my make up game. This is a super pale almost white gold colour that just reflects light so beautifully. It doesn't contain any chunky glitters which is nice because I find highlighters easier to use if they have more of a sheen than a glitter.

NARS Blush in Deep Throat
Originally I went for the much coveted Orgasm blush but when I saw it I was a little bit scared. After having a look around at other options I came to this one which is a lot less scary and actually very flattering on my skin tone. I feel that I end up with similar blushes because I know what looks good on me (Note to self: Step out of comfort zone.).

Ecotools Blush Brush
My mum had been using an older version of this brush (which she seems to love) so I thought that Ecotools would be a good brush to invest in. I really do like the Ecotools brushes because they are just so darn soft!...and not to mention great quality and not badly priced either. They are also a really good shape for picking up blush and giving a good application.

 (Elf St Lucia Blush & Bronze, Hourglass Ambient Lighting Blush in Diffused Heat, NARS Deep Throat Blush, NARS Albatross Highlighter)


The Eyes


MAC Extended Play Gigablack Lash Mascara
Such a mouthful of a name! This is my second ever MAC mascara and whilst the first could have easily put me off I had a bit of resilience about it and gave them another go. I am so glad I did, I originally tried the Zoom Fast Black Lash and was so disappointed. I found the formula to be quite clumpy and it also dried out really fast. This one however is amazing! It's quite defining and lengthening, it's super black and I've been using it for a while (probably longer than I should be) and it isn't anywhere near being dry.

Urban Decay Naked 2 Palette
I think I am honestly in love with this palette. Of course I love both the Naked 1 and 3 but I think this one is the most versatile out of them all. I think we all know how good the quality of these shadows are, they are buttery, very pigmented and (for me) not prone to creasing. I love the fact that there is a really pigmented matte black mainly because I use it for liner as it gives a softer smoked out look.

Clinique Bottom Lash Mascara
I bought this because of all the hype around it and at first when I was trying it out I wasn't that taken by it but then when I went back to using a regular mascara wand it was so difficult. The wand on this makes application sooo easy! The formula is also pretty nice, I haven't had any issues with it.

Elf Cream Eyeliner
I was so super surprised by this when I first tried it. I was expecting the colour to not set properly and end up with black half way up my eyelid but no, it sets perfectly! I totally tried this on a whim because I was after a new gel liner and I was making an Elf order anyway so I thought 'Why not?' and it paid off. The colour is opaque and really black. The formula is also creamy and doesn't seem prone to drying out. Nothing but good things to say :)

Kiss Eyelash Curlers
I haven't had too much experience with different eyelash curlers and I know loads of people have a preference (specifically I hear Shu Uemura is great for them) but to be honest I think half of it must come don to your technique and the other half comes down to the quality of the curler. I've heard horror stories about people cutting their eyelashes off because of a bad curlers so I definitely think investing in a reputable brand  is a must. I rally like my curlers and I've never felt in danger of chopping my lashes.

Collection Liner in Black
This is really just a standard twist up liner which I think is an absolute must in a make up bag. They're great for quick liner application when you don't have time. Not to mention they're easy to line your tightline and waterline with.

Real Techniques Shader Brush and Silicone Liner Brush
The shader brush is fairly small but is great at both packing on colour and blending out in a fine detail. The brush is really soft so it isn't at all irritating on your eyes. I'm also still putting the Silicone Liner Brush through the testing phase and I am getting better with it and I do really like it, perhaps I'll do a demo sometime.

(Urban Decay Naked 2 swatches - Foxy, Half Baked, Bootycall, Chopper, Tease, Snakebite, Suspect, Pistol, Verve, YDK, Busted and Blackout)

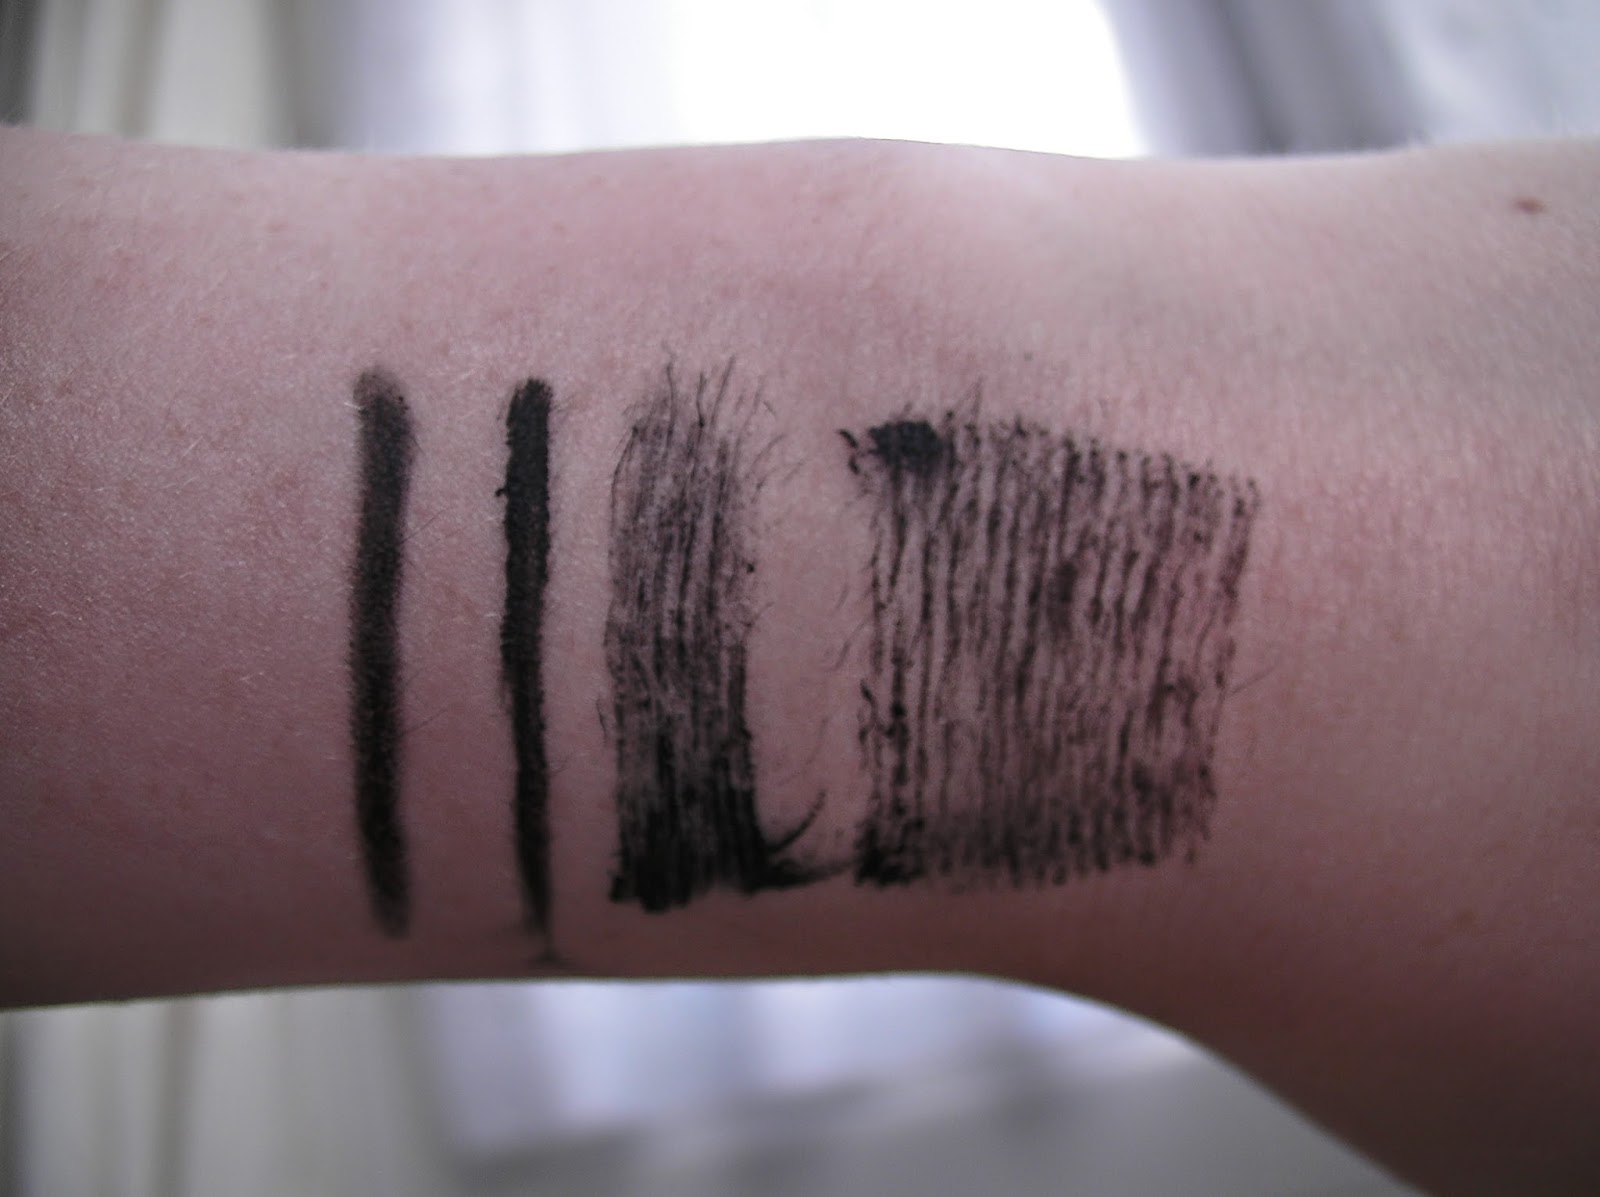
Oh yes I do weird swatches! (Collection Liner Elf Cream Eyeliner, Clinique Bottom Lash mascara, MAC Extended Play Gigablack Lash)


The Brows


Elf Eyebrow Kit in Light
I had tried pencils for so long and I wanted to change and nearly forked out for either Benefit Browzings or Urban Decay Brow Box but when I saw this I thought it would be a better option because of price. I was solely using this for ages but now I am only using the wax which I love because it gives nice definition and helps fill in any sparse areas. The powder is also pretty nice and would probably make a good eyeshadow so I will have to try using it like that.

Benefit Gimme Brow in Light/Medium
A couple of months ago I couldn't go down my Bloglovin' newsfeed without seeing at least 5 reviews of this, naturally I had to try it. I had been disappointed with brow gel in the past so I have no idea what on earth persuaded me to buy this especially considering the price! I am however thankful that something made me buy it because this has taken my brow game to the next level, I can honestly use this by itself and it will take me 2 mins to neaten and fill my brows and it will look like I spend ages on them.

Ecotools Liner Brush
This wa being used as a liner brush for a while but then I thought of combining the wax and gimme brow and needed a good angled brush, I have other liner brushes so I wasn't so fussed about changing the purpose of this one. It gives such a fine line and great detail which is exactly what I want.

More weird swatches! (first 2 lines Elf brow kit wax, Elf Brow kit powder, Benefit Gimme Brow)


The Lips


 Urban Decay Naked Ultra Nourishing Lip Gloss in Nooner
Damn I love this gloss! It's smooth and not at all sticky, it smells nice, it applies evenly and doesn't leave your lips feeling dry. I will probably invest in more of these in the future because I love this one so much!

Maybelline Baby Lips in Intense Care
I care a lip balm with me wherever I go because I hate the feeling of dry lips. One is always in my bag, if I'm going out and I'm dressed up I take whatever is on my lips and a lip balm. Sometimes I can't be bothered with the maintenance of whatever colour I'm wearing and if my lips have started to look chapped and dry I just start a fresh and apply some lip balm to calm it all.

MAC Cremesheen Lipstick in Creme Cup
I've had this for a while and I'm coming to the end of it which makes me a little sad because it is my favourite. I like to apply the UD gloss over the top of this lipstick because the pairing is unreal, it's so flawless!

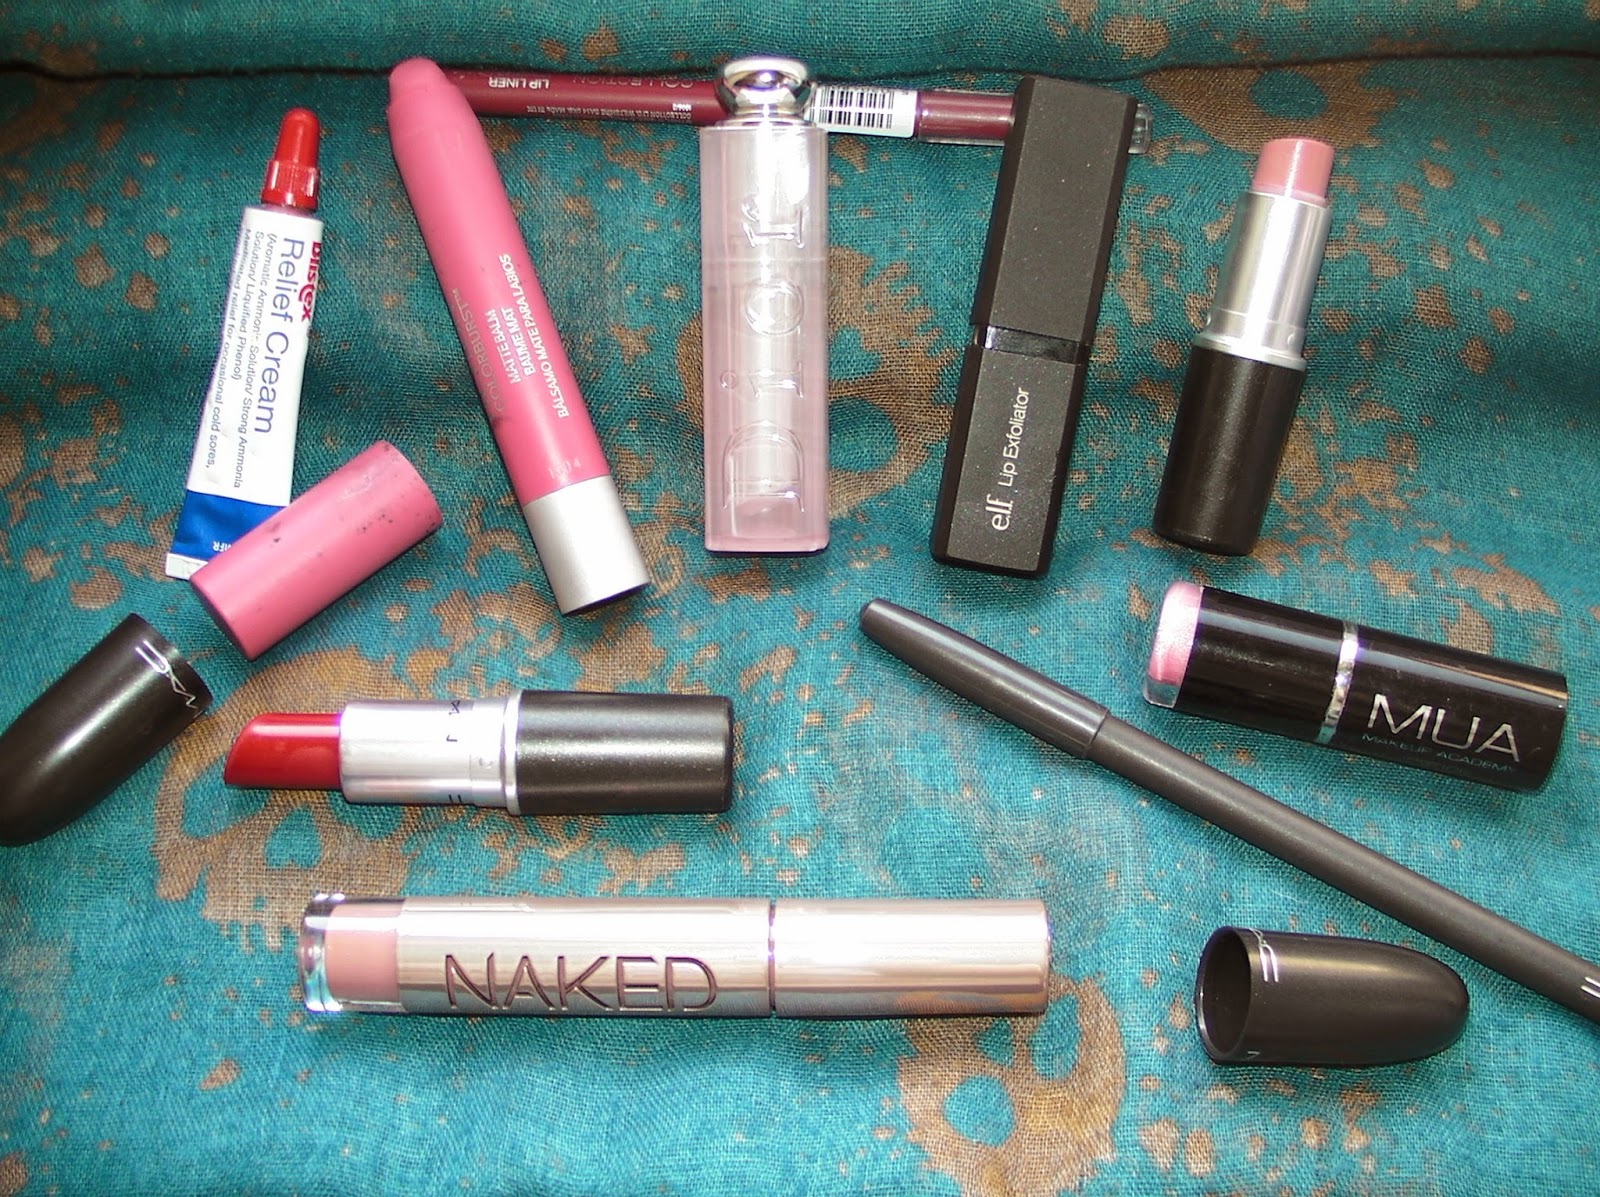
 (MAC Creme Cup, UD Naked Gloss in Nooner)


So that is everything that is in my make up bag, I told you that it was going to be a long post and I really hope it was worth the read for you. I'd love to know what's in your make up bags so if you've done any sort of similar post just comment below with it and I'll be sure to read it :)

Speak soon
Roo xx

Wednesday 21 May 2014

First Impressions: Benefit Porefessional

I have wanted to try this for a long time now, I have only ever heard rave reviews so naturally my curiosity spiked and I needed to see what all the hype was about. 

For anyone who doesn't know, Porefessional is a make up primer by Benefit. I'm a bit of a primer junkie so when I saw a sample tube of this in this months Elle magazine I just had to give it a go. 


This is a 7.5ml size which I think is a decent sample and that I'd probably be able to formulate a decent opinion on this product. Also I feel like I'm holding this weirdly and that's because I hadn't done my nails yet and they were a little bit worse for wear - didn't want to subject your eyes to that haha!

SUPER CLOSE UP! 

So this was different to what I expected. It has a silicon-ey feeling which I do quite enjoy but typically I expect them to be a clear formula where as this is more of a flesh tone. I was honestly expecting this to be closer to a moisturiser feel but oh well it's not really a problem. 


Yesterday I did get to use it properly for the first time instead of just repeatedly swatching it on my had and being somewhat satisfied with the feeling of rubbing it into my hand. I only actually wore concealer and powder on top of this, I was having one of those days where my skin's a little flaky and foundation will just make it look insanely bad. 

From my first try I have to say I quite like this, it smoothed my skin and my pores looked minimised, not forgetting that fact it kept my make up on quite well. Who know this might make just make it into my monthly favourites (ooooh!). 

The full size does retail for £24.50 for 22ml which I think is a little pricey but not as bad as some and also given the ratings I would say that it's worth trying. 

I hope you enjoyed this first impressions, let me know if you want to see more of these and also let me know your thoughts on the Porefessional.

Speak soon
Roo xx

Tuesday 20 May 2014

#BloggersDoItBetter - Spring Trends

This post was a little difficult to choose. I see trends pop up everywhere but it was difficult to decide what to write about in the end. The route I have decide to go down is going to be bright lips!

Bright lips are a massive trend at the moment and I personally think it is a really difficult trend to pull off so I thought I would write about a few simple steps you can take to make sure your bright lips are rockin'! 
Here we go!


Step 1. Choose a bright

This can be such a difficult thing to do especially if it's out of your comfort zone. Generally the rule is if you have cool undertones in your skin you should stick to blue based colours and if you have warm tones then go for orange based. If you are neutral then you can get away with everything! To be honest, I think that if you want to wear a colour then you should just go for it - confidence plays a massive part in your ability to pull something off. Then it's all up to you what colour you choose.


Step 2. Lip treatment

I can't stress how important it is to take good care of your lips.
It's pretty bad when you see someone with bright/dark lipstick on and all you can focus on it the dry chapped surface. I recommend using a lip scrub night and also a lip balm in the morning and evening. Really you can't over do it with lip balm so I'd try and carry one around with you whenever you can. This will all create a flawless surface for your lipstick. 


Step 3. Lip Liner

Totally optional but I have found that when I wear bright lips I prefer to wear a liner as it helps make the product better wearing and longer lasting. It's also great to prevent colour bleeding but if your lipstick doesn't tend to do that then liners not so necessary. Still I find that I can create clean lines with a liner before applying lipstick and looking neat is key. 


Step 4. Concealer

Again an optional step and not really necessary if you applied you lipstick neatly in the first place but using concealer around the lips after applying your lip products can neaten everything up and make the lines look crisp and sharp.


Those are my top tips but mainly just be confident with it :)
I hope you enjoyed this post

Speak soon
Roo xx


Sunday 18 May 2014

The Lip Product Addict Tag

This is a tag that was created by Amelia Liana and Estee (Essiebutton) and it is all about lip products (not super obvious)! 
If you want to see their video then I have linked it here

I was going to do this as a video but I wanted to post it sooner rather than later and I had issues with filming it. Anyway I am just going to crack on with this instead of rambling! 


1. Favourite balm/treatment?

Balms are my best friends, I have a bit of a love affair with them it's safe to say. It's not that I ever suffer from particularly dry or chapped lips but I know that I like my lips to feel moisturised. When it comes to my favourite I like to use Blistex cold sore treatment, I know it sounds strange but this stuff is seriously amazing. Obviously known for it's cold sore treating and preventing properties but it is also great for moisturising and this is an excellent multi-tasker, if they started making tinted versions then I would but their entire stock! 


2. Best eye-catching red?

I don't have that many red lip products as it but the ones I have I carefully chose because I think that red is a big commitment especially if you're not used to wearing it. My favourite definitely has to be MAC Russian Red, it's similar to Ruby Woo but has a slightly deeper tone to it which to me makes it a little more wearable. It also isn't as drying as Ruby Woo as it is a standard matte finish instead of a retro matte which seem to be especially drying. 


3. Best luxury & best drugstore?

Now everyone knows that drugstore lipsticks can be absolute gems and I have to say that my favourite so far is the Revlon Colorburst Matte Balm in Elusive. This is just a very pretty pinky nude that is also nice and moisturising despite being matte and it has a minty smell which is also good :) 

My favourite luxury is without a doubt the Dior Addict Lip Glow Color Reviver Balm (The original pink one). I love this because if you are in a hurry and you don't particularly have time to take too much care with your lipstick then this is so ideal, it's a sheer balm that when applied changes depth of pink depending on your skins pH levels. For me this shows up fairly light but I know on others it can come up bright pink. Not only does it look good but it is also quite nourishing and smells like sweet mint and vanilla or chocolate not sure but it's delicious smelling. 


4. Best MAC lipstick?

Hands down Creme Cup. This is the perfect balance between pink and nude so it doesn't ever look out of place. It works with all skin tones from what I have seen and obviously has the delicious MAC smell. This is a cremesheen finish which I wasn't really used to and to be honest it isn't my favourite finish but it means it's a bit more hydrating that other MAC lipsticks. 


5. The most disappointing?

MUA Shade 5. I got this as a present and as much as I love to sing praises about make up I get as presents it's just not possible, there's bound to be something I won't like. The colour was the first thing I didn't like - It's a very sheer, chunky glittered, juvenile baby pink (not me at all). It didn't sit well on the lips or feel that nice and the lipstick snapped when I swatched it on my hand (I didn't apply too much pressure or push the lipstick up that much!) so I kind of avoid MUA lipsticks which is a shame because I am sure there are some lovely ones out there.


6. Liner - yes or no?

Depends. If I am wearing dark lipstick I want to take every precaution possible to ensure that my lippy is going to look neat, stay in place and last a long time. Nude lips I tend not to bother because I don't feel like I'm in any danger wearing it haha!


7. Best gloss?

I don't wear that many glosses but my favourite by far has to be Urban Decay Naked Ultra Nourishing Lipgloss in Nooner. It took me ages to decide which colour to go for and I chose this one because it has no glitter and it's more of a nude than a pink. This has a strange but nice smell and the applicator is nice too, it's a bit of an elongated doe foot which isn't anything special but it's not messy and applies a good amount of product.  


8. Something extra!

Difficult to choose but it will have to be another treatment and it's the Elf Lip Exfoliator. I love this stuff, it comes in a lipstick tube and you apply it as though it is one, it has a rough surface that just helps to get rid of rough edges on your lips. It also smells like vanilla and is made with sugar so it's pretty tasty too!


So that is the end of the questions and I really hope that you enjoyed this tag. I'm not tagging anyone specifically because I think everyone should have a go at this. If you do give this a try then I would love to read/ watch it so comment your link below :)

Speak soon
Roo xx

Saturday 17 May 2014

And The Winner Is....

As you may know I have been running a give away for the past 15 days and it has just come to a close! 
This was the first give away that I have ever held and I was both excited and nervous for it. I was excited because I felt like I had reach a big milestone but nervous because I was worried that no one would enter the give away - I was so wrong!


The response was quite overwhelming and I couldn't be happier. Now time to get to the important part - The Winner.

Congratulations Ashley Horton! 

I will contact you via email to let you know and to also confirm an address. So keep an eye out for the box above :)

I really want to thank everyone for entering my give away as it has meant a lot. I really liked the comments that were made about favourite trends and I will be looking into these and hopefully putting some looks/ tutorials together for you all. 

Again, a massive thank you :)

Speak soon
Roo xx

Friday 16 May 2014

Fixation Friday: Makeup Revolution

I haven't posted a FF in a while but I'm getting back to them because I enjoy sharing my thoughts with you all.

So this week is all about Make Up Revolution
Ok so unless you have been living under a rock for the past few months then you have probably seen Makeup Revolution floating about on quite a few blogs. 

I first saw this palette above which is an identical dupe for the Urban Decay Naked 3 palette. Infact at lot of their palettes are dupes for Urban Decay and whilst I won't be buying any of the Makeup Revolution palettes (due to the fact I have the Naked 1,2 and 3) I would suggest giving this a try considering the beaming reviews I have seen. Their palettes seem to price about £4 which is a fraction of the cost and whilst I have seen good reviews they have been based around pigmentation comparisons and not staying power. I have seen a few reviews including this and the general consensus (correct me if I'm wrong) is that they don't stay nearly as well as the Urban Decay shadows. 

Not only their eyeshadows are getting great reviews, I have seen reviews on their foundation, concealer, lipstick and blush. I feel like I'm telling a secret but I'm sure it's not but a lot of their products are pretty spot on copies of higher end products (I'll let you guess what is what). 

That being said they do have a lot of their own unique products and I would love to try them considering they are a very inexpensive brand. 

Have you tried anything from Makeup Revolution? Let me know what you thought. 

Speak soon
Roo xx

DYO Fabulous Jewellery Event

Yesterday I went to my first ever blogging event!
This was for the company DYO Fabulous Jewellery and they were promoting the launch of their new website which will go live in July 2014. 


Now, muggins here stupidly forgot her SD card. Suffice to say I have no pictures of the actual event :( 
But anyway, let me tell you more about what happened at the event and more specifically about DYO Fabulous Jewellery itself...

I arrived at the event just before it started (early as always!) and was greeted by the DYO team. I have to say they are a lovely group of people who were very welcoming and also very informative! 

The event included a sample sale (up to 70% off!), a selfie station where you could try on the jewellery to obviously take a selfie, a lucky dip and a master class in jewellery making.

I was able to talk to the founder of the company, Janet, again a very lovely person to talk to and so passionate about her products - It's always refreshing to see someone so excited by their craft. She took me through some of the products that they sell, the upcoming changes to their website (very exciting!) and how she sourced the component for their jewellery. 

I was so overwhelmed by the variety of jewellery when I arrived, there were so many things to see and I would have bought so many things if I hadn't been on a spending ban! 

I managed to win myself the bracelet in the lucky dip (left on picture) and I made the necklace in the master class (right on picture). The master class was great, I have had experience in jewellery making before as I used to work on a jewellery stall in a market but this experience was amazing! Janet and her team were so helpful and very informative when it came to taking you through the steps of how to make the jewellery. 

Onto the website, I kinda wanna keep this post short and sweet as I don;'t have photos but there is so much I want to tell you about this great company. Anyway, their website dyofabulousjewellery.com is amazing and it's going to get even better in July. Their next move for the company is something I have never seen before - They are currently working on an interface for the website so that you can build your own bespoke piece of jewellery! They have painstakingly taken photos of every component and even included 360 shots so that you can really see what you're getting. Through the room there were busts set up of some of the jewellery that they had made using the interface next to their produced counterparts and they were identical. One of unique selling points of their new feature is literally that when you design your jewellery online it will look like that when you get it and you really won't be disappointed.

I feel like I'm rambling so in the meantime check out their website dyofabulousjewellery.com and keep an eye out for the launch of the interface in July. 

P.S. They had cupcakes, they were the best cupcakes ever! 

Speak soon 

Roo xx


Monday 12 May 2014

Diet Update #1!

Quite a few posts back I talked about how I had a little bit of weight to lose and that I would update you on how my progress has been. 

Well, progress is not the word I would use. I am really lazy when it comes to a diet and to be honest I have lost the whole of 1 pound in 2 weeks haha. I tend to stay at the same weight so that's at least something. 

So here are my measurements so far:

Height - 5ft 7.5in/ 1.71m
Weight - 10st 7lbs/ 147lbs
BMI - 22.8 (down by 0.1!)

Target:

Weight  - 9st 4lbs/ 130lbs
BMI - 20.1 (Still well into healthy range)

Weight to lose - 17lbs
Time Period - 14.5 weeks 
Weekly goal - By 19/05/14 - 10st 5lbs

Ok so I'm not doing as well as I thought (doesn't help that I made cupcakes the other day) so I am really going to have to up the anti here. So just over 1lb a week - I should be able to do this, I just need to get motivated. 

I'll try to update you all more.
Speak soon

Roo xx

Arabian Inspired Make Up | Me&MyMakeUp

Here is a tutorial I did inspired by one of the looks that Tanya Burr created, I love it - I hope you do too :)


Speak soon 

Roo xx

Sunday 11 May 2014

FOTD: Another Naked 3 Look!

My skin has been a little crap but I just really wanted to do another Naked 3 look but with some of the colours I don't use too often. 


So this look pretty much uses the entire Naked 3 palette but I really wanted to use the coppery colour 'Trick' because I rarely use it, so that's what is on my inner corner today. 


I'm also wearing the Revlon Matte Balm in Elusive. I'm convinced that this looks like a nude colour on everyone but me - It honestly feels like a bright pink. 


Ok, now I'm just being silly and I don't know what's happening with my hair! 


Anyway, I hope you like this look and if you would like to see a tutorial on this then let me know. 

Also don't forget to enter my giveaway here.
And vote for me in the 'Best New Beauty Blogger' Category for the Comso Blog Award 2014 here!

Speak soon
Roo xx

Saturday 10 May 2014

Now Time For Something A Little Different

I love to mix it up occasionally and post something that isn't about make up or skincare. So today, for all you bakers out there, I wanted to give you some inspiration. It's only going to be a short post but I hope you enjoy it all the same :)


My cupcakes look a little strange right? I get bored of the same old vanilla cupcakes so when I do find the inspiration to bake I like to make it interesting and challenging! 

Today I made vanilla cupcakes BUT with chocolate chips and a meringue topping. Meringue is a fantastic topping, it's plenty sweet but has a lightness that doesn't make the cake too much to eat. Obviously cupcakes aren't the healthiest option but it has a lot less calories than a buttercream frosting as it's sugar and eggs not icing sugar and butter. The finishing touches to the meringue is obviously to browned surface, it really adds a bit of texture and flavour but you really need to be careful to not burn the meringue but also not set the cupcake cases on fire like I did a few times! 

The only thing about this topping is that you will need a chef's blowtorch and I'm not certain how available but mine is a green colourworks one and I think it was around £9.99. Failing that I suppose you could try using a standard lighter though it may take a lot longer. Remember that if you are working with an open flame that you take all the necessary safety precautions, I recommend keeping a damp towel handy to smother a fire just in case! Of course try not to need it. 


To me, chocolate chips make the difference in a vanilla cupcake. It just adds something extra. You could try your hand at red velvet or any other flavours to shake it up. 

So I hope you like this post and let me know if you want to see some more of these 'Something Different' posts in the future. 

Speak soon
Roo xx


Friday 9 May 2014

Real Techniques Silicon Liner Brush | The Review

A few weeks ago I posted about a few bits and pieces I picked up from Boots and one of the things was the not so new Silicon Liner Brush from Real Techniques. I wanted to try this as soon as I saw it because it just looks so innovative and obviously the curiosity in me wanted to know if it really works or is more of a gimmick. So without further ado, here is my review (hehe I rhymed).


(Sorry it's dirty, I tried to clean it)

This is a super up close photo of the nib. It's not really a brush but what else do you call it? 
I have never seen anything like this so I was quite excited to try it out. 


I think this brush is definitely something you have to get used to, don't treat it like your everyday brush because it just doesn't work the same. 

The ideas I get from this brush towards it's benefits are that there is no waste, it's super precise and cleaning the tool is so easy. 

However, the cons I have found are that you have to dip your brush twice as much and you need enough on the brush so that it won't drag against your skin. 


So here's an up close photo of an application I did using the brush. It comes out nice an even and I managed to get the wing looking quite fine and neat. One big thing I would say is that you need to give this brush a chance, test it out and put it through a decent enough trial before you make a decision on it. I think that it is definitely a product to get used to. 

I used this with the Elf Cream Liner and different brands may make a difference to the application but I'm not sure. 

Overall I really like this brush so far, I know that you need to take a little longer using it but I find that I get a finer line and a more precise point. 

This was a really reasonable price at £5.99 and you can get it from Boots and Superdrug. 

Have you tried this? What do you think?

Don't forget to enter my give away!

Speak soon
Roo xx

Wednesday 7 May 2014

Top 6 Beauty Survival Items

We all have them, items that if you're in a hurry are the absolute essentials. I remember seeing a post a while ago to the same idea but it was slightly different and for the life of me I can't find where it was that I saw it (sowwie!) 

Anyway I thought I would list the top 6 items (In no real order) that I have to have if I need to look put together but just don't have the time.

I am so lazy with photos!

1) Primer
Seriously primer is the best thing you can do for your skin if you are gonna be out in public. It helps to smooth and blur imperfections as well as hydrate areas that need a little tlc. You can kick it up a notch by finding a primer with an SPF to help protect your skin and also find a colour correcting formula to help just make your skin look that little bit more flawless. 

2) Concealer
Concealer is a must have product for me. Pretty much every make up lover uses it and it is just magical stuff. I generally use this to dull down the appearance of imperfections and also to cover dark circles to make me look a little more awake. Also you can potentially double this up as a foundation. I need a lot of coverage so by the time I am done with this there is little point in me applying a foundation as I will just end up cakey - I'm always so envious of people who don't need concealer/ foundation, damn their flawless skin! 

3) Powder 
You will never know the importance of powder until you have experienced the nightmare of melting make up. Powder is your saviour when it comes to those hot days where your make up isn't up to the task of keeping your skin mattified, my tip is to apply this when doing your make up and then apply again during the day before your make up starts to melt - the more liquidy your make up the cakier it will end up. Obviously the best solution is to find your holy grail items that really require no touch ups but we all know how difficult that can be. 

4) Brow Kit
This has to be one of my most important features to attend to. Non groomed brows are a bit of a pet hate of mine - unless you have perfect full and tamed brown in which case I am so jealous! 
A good strong brow can really transform your look and really make it look as though you put in the extra effort. For speed I recommend a pencil with a spoolie on the end, if you don't mind paying a little more time to them then I say invest in a good wax/powder duo, this will be your full brow arsenal - wax will tame your brows and give them definition and powder will fill in the gaps and make them look a little more natural. 

5) Mascara
I have super short lashes so anything to emphasise their existence is a must. Obviously it's up to you what mascara works for you but for me it has to be the Lancome Hypnose range, they are just THE best mascaras I have ever tried.

6) Blistex Relief Cream
I can't live without this stuff! Sometimes you can't beat natural lips with a hint of gloss and this seriously does the job. Asides from that it is the ultimate remedy to a cold sore, this is a double-whammy product. The only thing I can think of that might put someone of is the minty tingle. It's not a painful tingle like in lip plumping glosses but more a cool mint tingle which I think is refreshing.


What are your must have products?
Dont forget to enter my giveaway!
Also, I would be super grateful if you could vote for me as 'Best New Beauty Blog' in the 2014 Cosmo Blog Awards here

Speak soon
Roo xx

Tuesday 6 May 2014

DIY: Coffee Body Scrub

I've wanted to make a coffee body scrub for awhile but I am very lazy so I have only just gotten round to it. Anyway, I have finally made one and I thought I would share the recipe with you :)

This was quite impromptu so the photos are a little cray haha.


Here is what you will need:

- Used coffee grounds, the more you have the more scrub you can make. 
- Hair oil, face oil really any body oil you already have
- Coconut oil, though you can replace this for any oil of your choice :)


Put your coffee grounds in a bowl, the fresher the ground the better. You could make a fresh scrub after your morning coffee and before you get in the shower! 
Then add around 20-30 pumps of hair oil, it seems like a lot but you need to get the coffee ground into more of a paste consistency. Finally, add about a tablespoon of coconut oil - this is a solid product so I recommend heating the oil to a liquid so that it is easier to mix. 

Once your mixture is nice and even then your scrub is ready! 
Coffee makes an excellent exfoliant and the added oils will be super nourishing on your skin. 
Perfect to get ready for summer :) 

Don't forget to enter my giveaway!
Also, I would be soo happy if you voted for me in the Cosmo Blog Awards under the 'Best New Beauty Blogger' category here 

Speak soon
Roo xx