So, yes it has been a while since I last posted but I'm still here.
I've been putting off posting anything new because I have been trying to get my camera sorted to be able to start uploading YouTube videos.
I know what I'm going to do my video about so I didn't want to post anything about it.
So if you are in fact looking forward to my upcoming videos then please be patient and I promise I will get them uploaded a soon as possible :)
-Ruby

Friday, 22 February 2013
Friday, 15 February 2013
Baking time!: Red Velvet Macaroons
I know it's not make-up related but I decided that because I was making red velvet macaroons today that I would share it with you and give you a step by step guide on how to create these little beauts all by yourself ;)
It is the day after Valentine's Day and in hindsight they would have been perfect to make then but oh well. The are just as nice for any other occasion.
So Here is what you'll need;

- Egg Whites Approx. 71g
- Caster Sugar Approx. 42g
- Ground Almonds Approx. 56g
- Icing Sugar Approx. 112g
- Unsweetened Cocoa Powder Approx. 6g
- Vanilla Extract
- Red Food Colouring
- Baking Parchment
- Flat Baking Tray
- Piping Bags
- Thermometer
- Food Mixer (not necessary)
 Step 1.
Place eggs in a bowl of warm water, water must be about 43 Celcius (Just hot water from the tap).
Bring eggs up to this temperature, then let them cool to room temp.
 Step 2.
Weigh out 71g of egg white, you won't need 5 eggs but I was making more than one batch.

Step 3.
Pour egg whites into food mixer and whisk at high speed for about half a minute or until they are foamy and are beginning to hold their shapes (soft peaks).
Then add 42g of caster sugar gradually until the mixture can hold its shape and is glossy (medium peaks). After this you should add your food colouring and vanilla into the mix.
 Step 4.
Put 56g of ground almonds in a bowl.
 Step 5.
Add 112g of Icing sugar into the same bowl.
 Step 6.
Then add 6g of coca powder into the bowl as well.
 Step 7.
Mix thoroughly. Also make sure that there are no lumps in the mixture - a good idea is to sift them into the bowl before mixing hahaha.
 Step 8.
Add the dry mixture to the wet one and with a spatula carefully fold the mixture you should do this in only one direction and do about 50 turns give or take. The mixture should be glossy and fall smoothly from the spoon.
 Step 9.
Heat your oven to about 150 celcius.
Put mixture into a piping bag, I suggest that you use disposable bags and don't cut the end off until you're ready to use the mixture. So if you don't have the fancy baking sheets with the circle moulds for macaroons then just y your best.
Pipe them out with about 3-4cm in between each one and pipe each one to be about 3-4cm - be aware that they will spread out quite a bit.
Let them sit for around 30mins or until they have developed a skin on top.
 Step 10.
Put them into the oven for around 10mins.
When you take them out they should have an even colour and have bubbled crisp edge on the bottom.
<-- Like so.
 I think my batch made about double what you see on the left so about 48-50 which when sandwiched together make 24/25.
For the filling, I decided not to take any pictures or go into any detail on this part because this is easy and everyone had a preference.
I made a vanilla buttercream but you can use jam, whipped cream, nutella, chocolate ganache, etc. It's all down to what you like best :)
I really hope this was helpful and have fun making these tiny delicious treats. Let me know how your's turn out and don't worry, if thy don't turn out right the first time then don't give up :)
-Ruby
It is the day after Valentine's Day and in hindsight they would have been perfect to make then but oh well. The are just as nice for any other occasion.
So Here is what you'll need;

- Egg Whites Approx. 71g
- Caster Sugar Approx. 42g
- Ground Almonds Approx. 56g
- Icing Sugar Approx. 112g
- Unsweetened Cocoa Powder Approx. 6g
- Vanilla Extract
- Red Food Colouring
- Baking Parchment
- Flat Baking Tray
- Piping Bags
- Thermometer
- Food Mixer (not necessary)
 Step 1.
Place eggs in a bowl of warm water, water must be about 43 Celcius (Just hot water from the tap).
Bring eggs up to this temperature, then let them cool to room temp.

Weigh out 71g of egg white, you won't need 5 eggs but I was making more than one batch.

Step 3.
Pour egg whites into food mixer and whisk at high speed for about half a minute or until they are foamy and are beginning to hold their shapes (soft peaks).
Then add 42g of caster sugar gradually until the mixture can hold its shape and is glossy (medium peaks). After this you should add your food colouring and vanilla into the mix.

Put 56g of ground almonds in a bowl.

Add 112g of Icing sugar into the same bowl.

Then add 6g of coca powder into the bowl as well.

Mix thoroughly. Also make sure that there are no lumps in the mixture - a good idea is to sift them into the bowl before mixing hahaha.

Add the dry mixture to the wet one and with a spatula carefully fold the mixture you should do this in only one direction and do about 50 turns give or take. The mixture should be glossy and fall smoothly from the spoon.

Heat your oven to about 150 celcius.
Put mixture into a piping bag, I suggest that you use disposable bags and don't cut the end off until you're ready to use the mixture. So if you don't have the fancy baking sheets with the circle moulds for macaroons then just y your best.
Pipe them out with about 3-4cm in between each one and pipe each one to be about 3-4cm - be aware that they will spread out quite a bit.
Let them sit for around 30mins or until they have developed a skin on top.

Put them into the oven for around 10mins.
When you take them out they should have an even colour and have bubbled crisp edge on the bottom.
<-- Like so.

For the filling, I decided not to take any pictures or go into any detail on this part because this is easy and everyone had a preference.
I made a vanilla buttercream but you can use jam, whipped cream, nutella, chocolate ganache, etc. It's all down to what you like best :)
I really hope this was helpful and have fun making these tiny delicious treats. Let me know how your's turn out and don't worry, if thy don't turn out right the first time then don't give up :)
-Ruby
Tuesday, 12 February 2013
Valentine's Day Nail Tutorial
Valentine's Day is less than 2 days away! So I have decided to do my very own nail tutorial :)
So I'm going to run through, step by step, how you can get this nail design :)

So, what you will need^;
- Tape (For masking the area around your nails)
- Nail Polish Remover (To clean up any mess around the nail)
- Cotton Buds/Q Tips (Use with nail polish remover)
- Cup of Water (To do the Water Marble technique)
- Cocktail Sticks (To draw pattern in the water)
- Selection of nail polishes, inc. Top/base coat and a base colour.
- Nail File/Filing tool to even out nail lengths.
 So, step 1.
Remove any nail polish that you have on already.
Make sure that your hands are completely clean to stop any dust/dirt getting into the water.
 Step 2.
If your nails are a little uneven then grab a nail file and file down any areas that need a little work.
I use the No7 Electric file, they can be a little difficult to control but do cut down on the time.
 Step 3.
You need to prep your nails for the technique.
To begin with use a clear base coat on your nails and let it thoroughly dry.
Next, Choose a base colour. I recommend using white or pale nude as this will produce the best colour results.
You can skip the base colour if you want the finish to be sheer.
 Step 4.
Not too sure if you can see this too well but I have taped around my nails so that the design doesn't transfer onto my skin :)
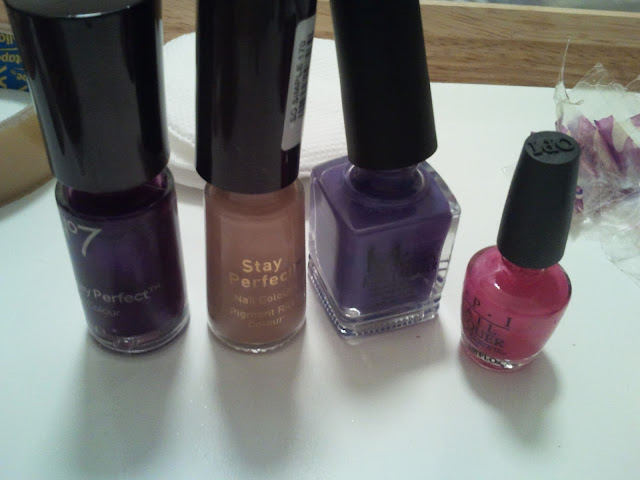
So I selected my colours and they are (From left to right);
- No7 Stay Perfect in Vivid Violet
- No7 Stay Perfect in So Simple
-Misa Nail Lacquer in Total Eclipse of the Heart
-OPI Brights in That's Hot! Pink
 Step 5.
What you need to do is carefully drop your first colour into the water, it should spread out and become very opaque, this is good because as you build the colours it will become more visible.
So once the first colour has spread, drop the second colour directly in the middle of the first and then let that one spread.
Keep doing this with about 3/4 colours until you build a colour ring which looks similar to the picture, you can add more rings if you like so you can build up the intensity. You need to build the ring as fast as possible otherwise it will dry and you won't be able to draw your pattern.
 Step 6.
Take your cocktail stick and gently draw lines in the water, dragging the polish as you go.
I decided to make the flower patter you can see.
You want to be careful not to put the stick in too deep otherwise the colour ring will split and the colour will bleed out.
So as soon you have your desired pattern, you are ready to do the transfer.
 Step 7.
Line up your nail with the part of the pattern you want to transfer and dunk your nail in. Keep your finger in the water until you have swept up the excess polish with a cocktail stick.
Your nails should end up something like the picture, hopefully with less mistakes :)
My nails are a little messy right now so what you need to do next is take a cotton bud/q tip and clean around any areas where polish isn't supposed to be.

So this is what the finished product should be!
Cute Water Marbled nails with bright pinks, peaches and purples :)
I really hope you like this nail tutorial :)
Have fun experimenting with this technique and have a great Valentine's Day!
-Ruby
So I'm going to run through, step by step, how you can get this nail design :)

So, what you will need^;
- Tape (For masking the area around your nails)
- Nail Polish Remover (To clean up any mess around the nail)
- Cotton Buds/Q Tips (Use with nail polish remover)
- Cup of Water (To do the Water Marble technique)
- Cocktail Sticks (To draw pattern in the water)
- Selection of nail polishes, inc. Top/base coat and a base colour.
- Nail File/Filing tool to even out nail lengths.
 So, step 1.
Remove any nail polish that you have on already.
Make sure that your hands are completely clean to stop any dust/dirt getting into the water.

If your nails are a little uneven then grab a nail file and file down any areas that need a little work.
I use the No7 Electric file, they can be a little difficult to control but do cut down on the time.

You need to prep your nails for the technique.
To begin with use a clear base coat on your nails and let it thoroughly dry.
Next, Choose a base colour. I recommend using white or pale nude as this will produce the best colour results.
You can skip the base colour if you want the finish to be sheer.

Not too sure if you can see this too well but I have taped around my nails so that the design doesn't transfer onto my skin :)

So I selected my colours and they are (From left to right);
- No7 Stay Perfect in Vivid Violet
- No7 Stay Perfect in So Simple
-Misa Nail Lacquer in Total Eclipse of the Heart
-OPI Brights in That's Hot! Pink
 Step 5.
What you need to do is carefully drop your first colour into the water, it should spread out and become very opaque, this is good because as you build the colours it will become more visible.
So once the first colour has spread, drop the second colour directly in the middle of the first and then let that one spread.
Keep doing this with about 3/4 colours until you build a colour ring which looks similar to the picture, you can add more rings if you like so you can build up the intensity. You need to build the ring as fast as possible otherwise it will dry and you won't be able to draw your pattern.
 Step 6.
Take your cocktail stick and gently draw lines in the water, dragging the polish as you go.
I decided to make the flower patter you can see.
You want to be careful not to put the stick in too deep otherwise the colour ring will split and the colour will bleed out.
So as soon you have your desired pattern, you are ready to do the transfer.

Line up your nail with the part of the pattern you want to transfer and dunk your nail in. Keep your finger in the water until you have swept up the excess polish with a cocktail stick.
Your nails should end up something like the picture, hopefully with less mistakes :)
My nails are a little messy right now so what you need to do next is take a cotton bud/q tip and clean around any areas where polish isn't supposed to be.

So this is what the finished product should be!
Cute Water Marbled nails with bright pinks, peaches and purples :)
I really hope you like this nail tutorial :)
Have fun experimenting with this technique and have a great Valentine's Day!
-Ruby
Saturday, 9 February 2013
My Favourite Perfumes
These are my 2 favourite perfumes ever! I use them an awful lot, not everyday because some days I like to use just a body spray because they are a lot cheaper than perfume haha :)
So the first one is my all time favourite and it is Pure Poison by Dior.
It is an EDP (Eau De Parfum) and the 100ml bottle retails for around £63

My first memory of this is smelling a sample of it in a
magazine and absolutely falling in love with it!
I'm not sure how old I was or when the perfume was first released but I think I was in my early teens.
I didn't actually get the perfume until Christmas when I was 14/15 from my boyfriend Daniel and I used it up so fast.
After that I didn't have it for such a long time so I persuaded him to buy it again and I think this was either for my 18th birthday or the Christmas after and I got the full size, also with a small sample of J'adore by Dior which is also very nice but not my favourite.
I only have about 25ml left out of a 100ml bottle so I'm going really easy on it and only use it for special occasions.
My other favourite is a new release perfume and it is Fame by Lady Gaga and I love this perfume its soo warm and subtly floral with very sweet fruity notes. I know a lot of people said this was too similar to other perfumes but it's totally original to me and for the price I'm not complaining :)
The 100ml bottle retails for £33 (not to bad for an EDP).

It comes with a very strange lid, the spikes down the side are part of the lid and what I like is that it is actually metal and not cheap plastic.
It is a black liquid which becomes transparent when airborne and that just makes it look soo appealing.
I got this from Daniel for my 19th birthday which was in October, I use it a lot and I am just amazed at how long it lasts.
I also got the soap, body wash and body lotion;
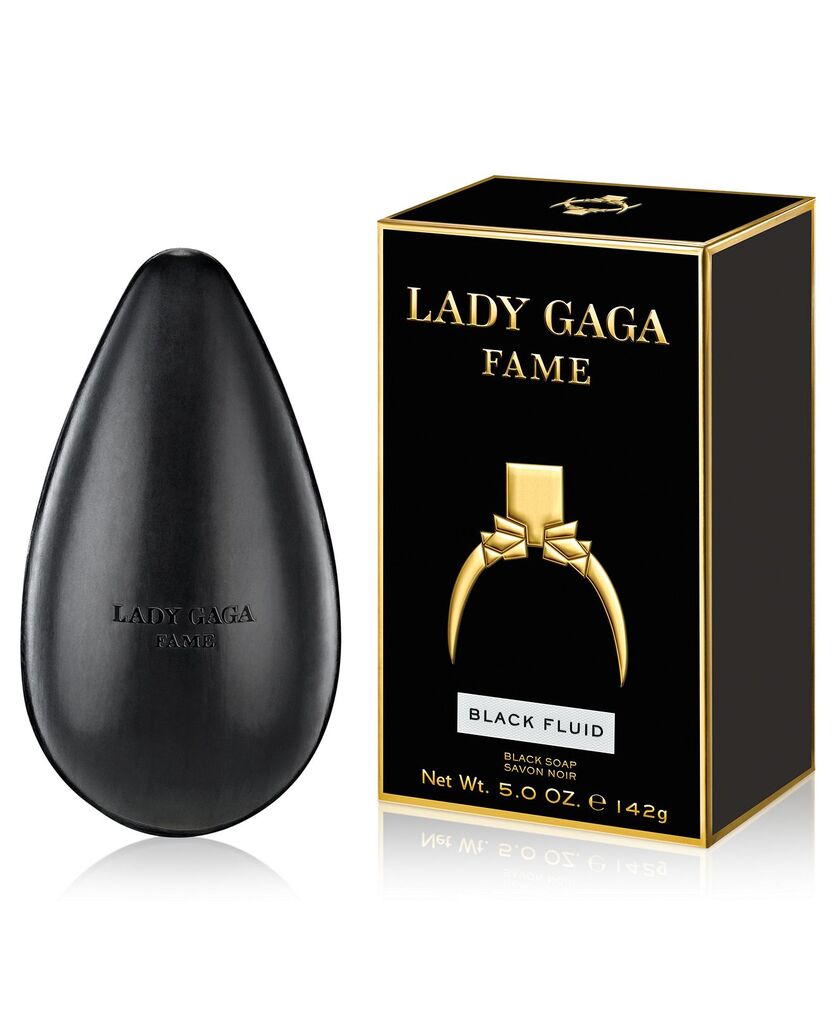
The soap, also black has the same wonderful smell as the perfume and it is very reminiscent of the egg she arrived in at the Grammy's.
The body wash and lotion came in a black cuboid shaped bottle with a gold lid and again they are both black liquids! They smell absolutely gorgeous and just feel so luxurious :)
The soap retails for around £15, the body was is about £15 and the body lotion is around £11
There is also a travel size roller ball perfume applicator which I can't find GBP price for but is about $19.
Hope you like this :)
-Ruby
So the first one is my all time favourite and it is Pure Poison by Dior.
It is an EDP (Eau De Parfum) and the 100ml bottle retails for around £63
My first memory of this is smelling a sample of it in a
magazine and absolutely falling in love with it!
I'm not sure how old I was or when the perfume was first released but I think I was in my early teens.
I didn't actually get the perfume until Christmas when I was 14/15 from my boyfriend Daniel and I used it up so fast.
After that I didn't have it for such a long time so I persuaded him to buy it again and I think this was either for my 18th birthday or the Christmas after and I got the full size, also with a small sample of J'adore by Dior which is also very nice but not my favourite.
I only have about 25ml left out of a 100ml bottle so I'm going really easy on it and only use it for special occasions.
My other favourite is a new release perfume and it is Fame by Lady Gaga and I love this perfume its soo warm and subtly floral with very sweet fruity notes. I know a lot of people said this was too similar to other perfumes but it's totally original to me and for the price I'm not complaining :)
The 100ml bottle retails for £33 (not to bad for an EDP).
It comes with a very strange lid, the spikes down the side are part of the lid and what I like is that it is actually metal and not cheap plastic.
It is a black liquid which becomes transparent when airborne and that just makes it look soo appealing.
I got this from Daniel for my 19th birthday which was in October, I use it a lot and I am just amazed at how long it lasts.
I also got the soap, body wash and body lotion;
The soap, also black has the same wonderful smell as the perfume and it is very reminiscent of the egg she arrived in at the Grammy's.
The body wash and lotion came in a black cuboid shaped bottle with a gold lid and again they are both black liquids! They smell absolutely gorgeous and just feel so luxurious :)
The soap retails for around £15, the body was is about £15 and the body lotion is around £11
There is also a travel size roller ball perfume applicator which I can't find GBP price for but is about $19.
Hope you like this :)
-Ruby
Friday, 8 February 2013
My Make Up Today :)
I was so happy with my make up today I thought I'd share it with you all!
Please ignore the fact that my skin is a little red - I have a few blemishes and I need to buy some concealer haha :)
 So here's what I used for this everyday, very natural look;
1. Skin Prep - First I cleansed my face with Neutrogena Visibly Clear Pink Grapefruit Wash to, secondly I used the Neutrogena Pink Grapefruit Moisturiser to stop my skin from getting dry, Lastly I sprayed M.A.C Fix+ evenly over my fce to try and reduce the redness (It really helped.)
2. Foundation - M.A.C Studio Sculpt in NC15 applied with the M.A.C 190 foundation brush.
3. Brows - Soap and Glory Arch de Triumph brow pencil and highlighter duo, Not too heavy so the colour looks unnatural but enough to make your eyebrows look defined, brow bone also lightly highlighted and blended
4. Eyes - No7 Smoky Rose Quad, the frosted white colour for brow highlighter and the light rose gold for all over lid colour.
Maybelline gel eyeliner- small winged effect for cat eyes and finished with No7 Lash 360 mascara applied to the top lashes.
5. Lips - 17 lipgloss, it was a sparkly sheer nude colour but I don't think it shows up too well on camera.
I really hope you like this look and I may decide to do a tutorial on this in the coming weeks :)
-Ruby
Monday, 4 February 2013
One Of My Favourite Skincare Products
Hi All!,
I thought I'd mention my one of my favourite skincare products and I did a lot of extensive research into this item.
The item is Alpha H Liquid Gold and this is literally supposed to work noticeably over night.

<--This is the bottle I have and I only bought the 50ml size just to try it out and it was quite expensive, It cost me roughly £15.00 for a 50ml bottle and the going rate for the 100ml size is £31.50 or thereabouts.
The main advertised ingredient is glycolic acid which is why I was hesitant about buying it and decided to do more research on it. I mean, I didn't really want to put acid on my face.
So I tried it out and I was so amazed, my face was less red and blotchy and within about 1-1.5 weeks I had noticed that I had clearer skin.
Because I have combination skin I thought that this would be good to try and I honestly recommend that it you do have problems with your skin then it might be worth investing in a sample size. Like I said it's a little pricey but it is totally worth it, so if you don't mind spending a little more on a skincare product then I seriously recommend it :)
-Ruby
I thought I'd mention my one of my favourite skincare products and I did a lot of extensive research into this item.
The item is Alpha H Liquid Gold and this is literally supposed to work noticeably over night.
<--This is the bottle I have and I only bought the 50ml size just to try it out and it was quite expensive, It cost me roughly £15.00 for a 50ml bottle and the going rate for the 100ml size is £31.50 or thereabouts.
The main advertised ingredient is glycolic acid which is why I was hesitant about buying it and decided to do more research on it. I mean, I didn't really want to put acid on my face.
So I tried it out and I was so amazed, my face was less red and blotchy and within about 1-1.5 weeks I had noticed that I had clearer skin.
Because I have combination skin I thought that this would be good to try and I honestly recommend that it you do have problems with your skin then it might be worth investing in a sample size. Like I said it's a little pricey but it is totally worth it, so if you don't mind spending a little more on a skincare product then I seriously recommend it :)
-Ruby
Saturday, 2 February 2013
New/Future Purchases (Candle alert!)
Hi Everyone!
I bought a new candle today :)
Pre-warning: If you don't like candles and you love make-up the go ahead and skip past :)
I got the WoodWick Trilogy candle in Clothesline Fresh in the 22oz size and I am just sooo happy about it.
It has (as it suggests) 3 different fragrances which are Cotton Flower, Linen and Cashmere, so they are all pretty fresh fragrances which you just can't go wrong with!

They are just such candles, you can get single fragrances ones but these ones are just lovely :)
I work at a shop which sells a lot of candles so I am a bit of an expert in them :P
I think I am obsessed with candles though, they are just so mice to burn, they just give the room a nice ambience.
So here are the facts about WoodWick candles;
-The special signature feature of the candles is that instead of having a normal cotton wick they have a wooden wick (duhh!) and this gives off an amazing crackle sound, like a real fire but not nearly as intense.
-The wax is super soft so it melts faster giving a faster fragrance but they don't burn as quickly as a normal candle so it lasts well.
-You need to trim the wick to get a full life hahaha.
Enough about candles though,
I have decided already what I will be buying on payday!
I thought well I need a new mascara so I thought I'd go for the Maybelline Falsies Flared mascara but then I saw that they brought out a new one called the Rocket Volum' and I think I might just buy that instead or both!
Then I think I am going to buy the new Rimmel Apocalips lip laquers :)
And from what I remember watching FleurDeForce talking about them, she said they were 3 for 2 in Boots so that is perfect.
I decided the colours I would buy are;
 <--Celestial which is a lovely nude/pink colour
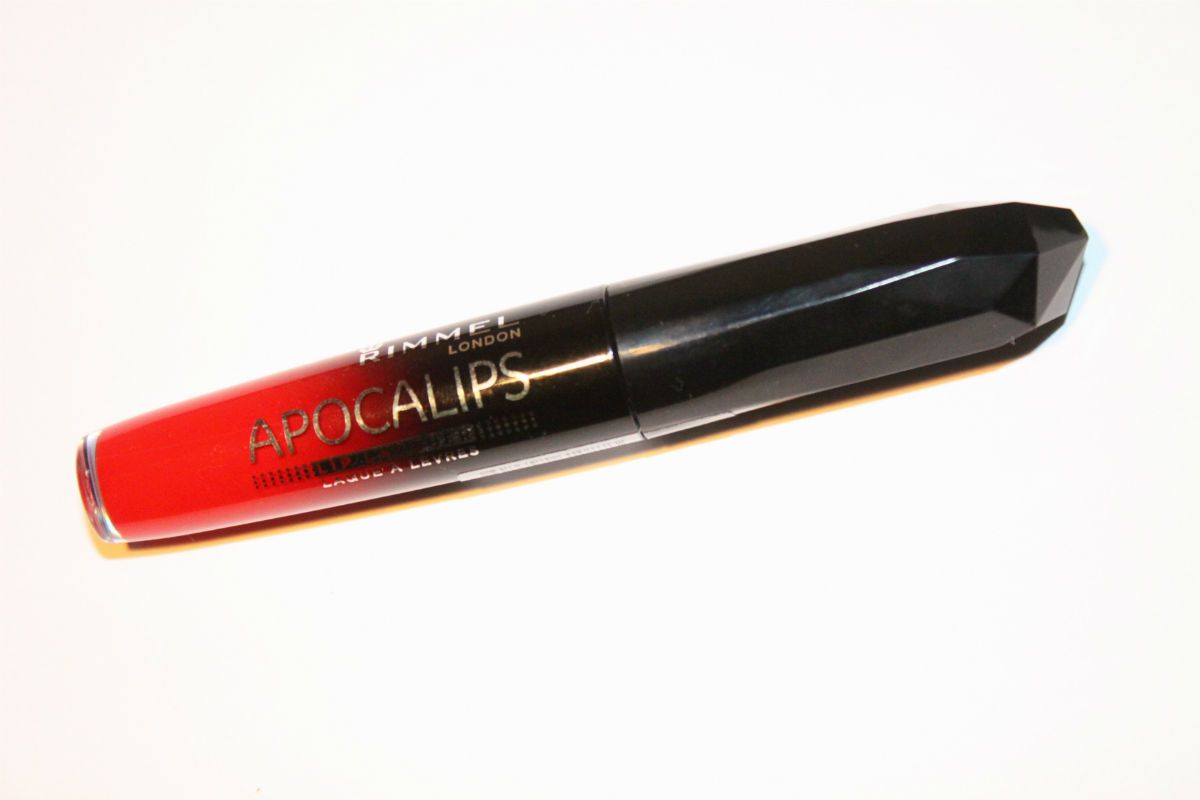
<---Big Bang, a very vibrant glossy red, which I love and because I have very pale skin, I think it just looks amazing in contrast.

<---Nude Eclipse which will look great against my complexion and I can wear with any make-up or just to make my lips even and glossy.
I probably will end up buying more than this but these are the ones I thought I'd talk about :P
But please look out for my first ever video! Which is going to be a first impressions review or a haul on these products!
-Ruby
I bought a new candle today :)
Pre-warning: If you don't like candles and you love make-up the go ahead and skip past :)
I got the WoodWick Trilogy candle in Clothesline Fresh in the 22oz size and I am just sooo happy about it.
It has (as it suggests) 3 different fragrances which are Cotton Flower, Linen and Cashmere, so they are all pretty fresh fragrances which you just can't go wrong with!
They are just such candles, you can get single fragrances ones but these ones are just lovely :)
I work at a shop which sells a lot of candles so I am a bit of an expert in them :P
I think I am obsessed with candles though, they are just so mice to burn, they just give the room a nice ambience.
So here are the facts about WoodWick candles;
-The special signature feature of the candles is that instead of having a normal cotton wick they have a wooden wick (duhh!) and this gives off an amazing crackle sound, like a real fire but not nearly as intense.
-The wax is super soft so it melts faster giving a faster fragrance but they don't burn as quickly as a normal candle so it lasts well.
-You need to trim the wick to get a full life hahaha.
Enough about candles though,
I have decided already what I will be buying on payday!
I thought well I need a new mascara so I thought I'd go for the Maybelline Falsies Flared mascara but then I saw that they brought out a new one called the Rocket Volum' and I think I might just buy that instead or both!
Then I think I am going to buy the new Rimmel Apocalips lip laquers :)
And from what I remember watching FleurDeForce talking about them, she said they were 3 for 2 in Boots so that is perfect.
I decided the colours I would buy are;
 <--Celestial which is a lovely nude/pink colour
<---Big Bang, a very vibrant glossy red, which I love and because I have very pale skin, I think it just looks amazing in contrast.

<---Nude Eclipse which will look great against my complexion and I can wear with any make-up or just to make my lips even and glossy.
I probably will end up buying more than this but these are the ones I thought I'd talk about :P
But please look out for my first ever video! Which is going to be a first impressions review or a haul on these products!
-Ruby
Subscribe to:
Posts (Atom)