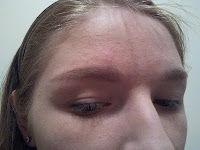
So this is going to be a 50s/ classic sexy look which is great for all hair/skin colours.
Remember, if you have pale skin go for red which have bluish undertones.
Step 1. Cleanse
You want to start off with a fresh clean face, as always.
I have cleansed with Neutrogena Pink Grapefruit Face Wash,
moisturised with Neutrogena Pink Grapefruit moisturiser and then sprayed a little MAC Fix+.
So just do your normal skin cleansing routine, just whatever suits your skin type :)
Step 2. Face
I have put my hair back and applied 2 layers of foundation to help get better cover.
I'm using a sample of the new Lancome Teint Miracle.
This foundation is quite runny but gives a really nice coverage and finish.
I also used my Garnier BB Cream roll on under the eyes to help cover up dark circles.
Finally set with Revlon Nearly Naked Pressed Powder in 010 Fair.
Step 3. Eye primer
If you can then prep your eyes,
I am using Urban Decay Primer Potion because it's just simply amazing!
You want to make sure to blend it in right up to your brow bone because you want your highlighter to stay put as well.
Step 4. Brows
So it's time to fill in your brows, I'm using Soap and Glory Arch de Triumph combined with a brow brush to make the colour look more natural.
It's not that my brows are sparse but more so that they are very fair coloured so it dramatically changes my look when I fill them in.
My suggestion is that you can do one of 2 things for your brow shape for this look.

The first is that you can do what I've done which is try to go for an Audrey
Hepburn style and make your brows straighter with a slight arch, obviously her brows are a lot darker than mine but it would look strange on me.
Second, you could hike your arch up slightly more than normal to give your look that super sexy edge. With both styles, try and thicken your inner brow and make them look fuller, but not too much or it'll look like you've got ferrets stuck to your brow bone!
Step 5. Eye Shadow
I'm using the Urban Decay Naked palette for this.
So use a highlighter on your brow bone, I have used Virgin for this because it has a slight shimmer.
The lid colour is Naked, the crease colour is Buck and the outer corner colour is Darkhorse.
Be sure to blend these well and give a neutral smoky effect to your eyes.
Step 6. Eye Liner
I'm using a Maybelline gel eyeliner with a small flat round tip brush.
Draw a fluid thick black line and then wing it slightly for a cat like effect, this will help later when you apply your mascara as it will make your lashes look fuller, longer and with and nice curl.
Step 7. Mascara
I have used the Maybelline Rocket Volum' mascara for this because I feel thatit does give my lashes a bit more lift.
My lashes are also quite short so they are difficult to see.

Enter the lash shot, I've purposely took a photo from this angle so you can see my lashes :)
They aren't clumped but they look like they've got volume!
Finally Step 8. Lips
I've taken a few photos for this one because I think that if you aren't brave enough for the daring red lips then you should at least have options.
<-- This one is a nude lip gloss, this is from the Apocalips range by Rimmel and is called 'Nude Eclipse'.
<-- This is a more colourful but still playing it safe beige pink.
This is also from the Rimel Apocalips range and it is called 'Celestial'.
Finally the red lips :)
I am using Maybelline Superstay 10 Tint Gloss in Endless Ruby for this look.
I think this is just so vibrant and classy when paired with neutral eyes and it doesn't look over the top.
I really do think that every girl should have a good red lip colour :)
I hope you like this tutorial and let me know if you want to see anything different :)
-Ruby


No comments:
Post a Comment
I love to read everyone's thoughts, comments and opinions and I'll always try to reply :)